26 incredibly useful things you didn’t know Google Calendar could do
If there’s one digital tool I rely on as much as Gmail, it’s Google Calendar.
From work deadlines to family happenings and random reminders, Calendar is what keeps me on track, on time, and on top of the approximately 1.7 zillion things I tend to juggle on an hourly basis. And the more I’ve used it, the more I’ve learned just how flexible it is—and how many easily overlooked options it offers for enhancing its interface, getting stuff accomplished more efficiently, and making the service work in whatever way makes sense for my own personal workflow.
If you rely on Google Calendar like I do—or even if you just use it casually to keep track of occasional appointments—you’ll get more out of it once you’ve discovered all of its advanced tricks and time-saving possibilities. And if you’re too busy to tackle this right now, no worries: I happen to know a spectacular tool for setting reminders and making sure you never forget anything on your agenda.
(Unless otherwise noted, all the instructions mentioned below are specific to Calendar’s web version.)
Interface enhancements
1. Wish your calendar could show a little more info—with less wasted space? Google Calendar has a hidden option to increase its display density. Click the gear icon in the website’s upper-right corner, then select “Density and color” and change the “Information density” setting to “Compact” to try it.
2. If most of your appointments tend to be during the week, you can also tidy up your view by telling Calendar to stop showing weekends. You’ll find the toggle by clicking the view dropdown—the box directly to the right of the gear icon on the Calendar website—and looking at the bottom of the menu that appears.
3. Even if you want to see weekends, you might prefer to show your weeks starting with Mondays and ending with the weekend—the way most of us think of a traditional workweek. You can make that change with a couple of quick clicks by opening the “View options” section of the Calendar site’s settings.
4. Google Calendar can let you create your own custom view in addition to the standard day, week, month, and year arrangements—if, say, you want to view your calendar in a zoomed-in two-day perspective or maybe a zoomed-out two- or four-week layout. Open the site’s settings, click “View options” in the left-of-screen sidebar, and then adjust the “Set custom view” option to set it up however you like.
5. Having multiple calendars in your account can often be useful, whether you’re separating holidays, shared family events, or any number of shared work-related agendas. But some calendars aren’t important enough to be seen all the time—so let Calendar hide low-priority calendars by default and then show them only when you need them. In the left-of-screen sidebar on the Calendar website, uncheck the box next to any calendar you don’t want displayed. That’ll keep it out of sight and clean up your active view, and you can then just recheck the calendar in question when you want it to appear.
6. Conversely, Calendar can show you a single calendar at a time for a slimmed-down and easily digestible arrangement. Click the three-dot menu icon next to any calendar’s name in that same left-of-screen sidebar area, then select “Display this only” to give it a whirl.
7. Clear out clutter and give your calendar more space to spread out by hiding Google Calendar’s sidebars whenever you aren’t using them. On the left side of the screen, click the three-line menu icon at the top to collapse the sidebar (and then click that same icon to expand it as needed). On the right—the sidebar that lets you view your Google Keep notes and other connected services—click the small left-facing arrow at the bottom to make that area vanish (and then click the right-facing arrow that appears if and when you want to bring the panel back).
8. Manage appointments across multiple time zones by activating Calendar’s secondary time zone option, which gives you the ability to have events start or end in different time zones and avoid any confusion or need for on-the-fly mental conversions. Look for the “Time zone” header in the website’s settings, then check the box next to “Display secondary time zone” and select what time zone you want. You can also give each time zone a label (“Boston” and “California,” for example) to make things even simpler.
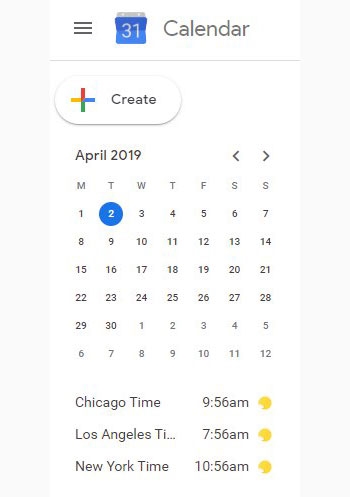
9. Calendar can also show you a world time clock to give you an at-a-glance view of the current time in any number of places. Look for the “World clock” option in the website’s settings; once it’s activated, you can add however many time zones you want, and they’ll all be displayed in the left-hand sidebar.
Time-saving tools
10. Switch your calendar view in an instant by tapping into one of Google Calendar’s super-handy hidden shortcuts: Press “1” or “d” for the day view, “2” or “w” for the week view, “3” or “m” for the month view, “4” or “x” for your custom view, “5” or “a” for the agenda view, and “6” or “y” for the year view.
11. One of Calendar’s best hotkeys is also one of the easiest ones to overlook: Press “g” from any calendar view to jump directly to any specific date, in any year. Calendar will pop up a box in which you can simply type whatever date you want, using either a standard date format (“4/13/06”) or a text-based description (“April 13, 2006”).
12. Another shortcut worth remembering: From anywhere on the Calendar site, hit the Esc key to jump back to the main calendar screen in a jiff. And while looking at any calendar view, hit “t” to return to today’s date.
13. While in Calendar’s day, week, or month view, you can left-click on any event for a fast pop-up view of its details—or right-click to access quick event adjustment options, including a selector to switch the event’s color and a one-click button to delete the event entirely right then and there.
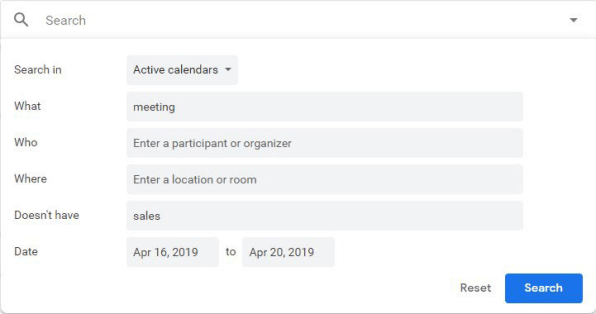
14. Google Calendar’s search function is a great way to find an event in a hurry, and it has more options than you’d think: After clicking the search icon at the top of the Calendar site, click the downward-facing arrow in the search box that appears. That’ll reveal an advanced search panel that lets you narrow a search down to specific calendars, dates, locations, or participants—and even search for an event by excluding certain keywords.
15. Calendar has a little-known command that’ll let you undo errant actions—like moving an event by mistake or deleting the wrong appointment. As soon as such an instance arises, hit Ctrl-Z or even just “z” by itself on your keyboard. You have only about a 10-second window to do it, annoyingly, but if you catch your slipup soon enough, it’s a great way to fix your flub.
16. For times when you delete an event entirely and then need to get it back later, don’t forget about Google Calendar’s tucked-away Trash section. It gives you the opportunity to recover any deleted event for a month after its axing. You can find the Trash section by clicking the gear icon in the site’s upper-right corner and selecting the “Trash” option in the menu that appears.
17. Need to create an event that’s almost exactly like one already present on your calendar? Google Calendar has a hidden option to duplicate an event and use it as a blueprint for a new calendar entry. Just open up the event you want to use as the model, then click the “More actions” button in the upper-right corner of the screen. There, you’ll find the convenient command to duplicate the event and start a fresh one with its details prefilled and ready for editing.
Event enrichments
18. Did you know you can add an attachment directly to an event within Calendar—something like a PDF, image file, or document that you want all the invitees to see? When creating a new event, look for the paper clip icon in the toolbar atop the description field. Clicking it will allow you to insert any file from your local device or your Google Drive storage.
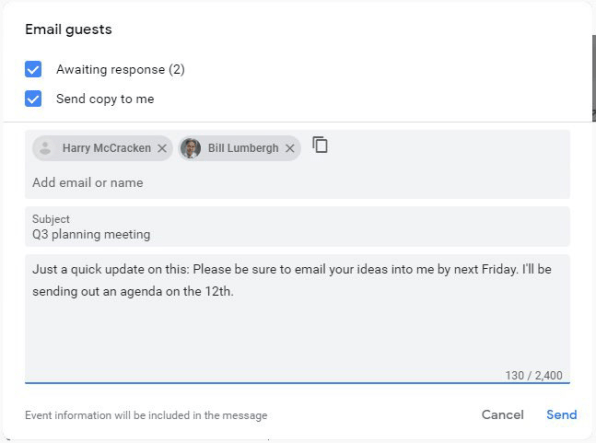
19. When you need to send a message to everyone invited to a particular event, save yourself the trouble of opening up your inbox and instead just email all of your event invitees directly from Calendar. While viewing any event that has at least one other person involved, you’ll see a small envelope icon under the “Guests” header on the right of the screen. Click that icon, and you can compose and send your message right within that window, directly from the Gmail address associated with your account.
20. If you create a group event but then end up needing to back out of attending, Calendar has a way to let you transfer event ownership so the event can continue in your absence. Open up the event from the Calendar website, click the “More actions” button in the upper-right corner of the screen, and select “Change owner” from the menu that appears. Then, you can type in the name or address of whomever you want to take over as the primary point of contact.
21. By default, new events in Google Calendar last for an hour and include alerts 30 minutes before their scheduled start times—but you can customize both those settings and give events any default duration and notification schedule you like. To change your default duration, look in the “Event settings” section of the Calendar site’s settings and find the aptly named “Default duration” option. The default notification time, meanwhile, can curiously be changed only in the Calendar mobile app: On Android or iOS, find the section specific to your Google account within the app’s settings and tap on “Events,” then adjust the “Default notifications” settings as needed.
22. Got something that needs to be on your agenda on a regular, repeating interval? Calendar can handle recurring events and reminders with some impressively customizable parameters. While creating a new event or reminder, click the box labeled “Does not repeat” (beneath the date and time and to the right of the “All day” option). That’ll give you a list of preconfigured patterns—having the item repeat daily, weekly on the current day, monthly on the current day, and so on—along with an option called “Custom” that lets you get incredibly specific about exactly how, when, and for how long you want your item to recur.
Advanced alerts
23. In addition to the usual notifications on the desktop and on your phone, you can ask Calendar to send you an email notification for any event. That can be especially helpful if you spend a lot of time in your inbox and want to have a reminder that remains present until you archive it. To create an email reminder for an event, open the event and then click the “Add notification” command. Next, within the new line that appears, click the “Notification” box and change it to “Email”—then just tell Calendar how far ahead of the event you want the email to arrive. Be sure to hit the blue “Save” button at the top of the screen when you’re done.
24. If you want to get email alerts for all events by default, open up Calendar’s settings and select your calendar from the list on the left side of the screen. Scroll down to the “Event notifications” section and click the “Add notification” button. Click on the new “Notification” box that appears, change it to “Email,” and set it for whatever amount of time you’d like.
25. You can also change your default alert times for regular Calendar notifications in that same area of the site’s settings: Just adjust the number of minutes next to the existing notifications under the “Event notifications” and “All-day event notifications” headers. You can add additional notifications, too, or remove any existing notifications by clicking the “x” alongside them.
26. Want to get a daily rundown of your Calendar agenda via email every morning? Look under the “General notifications” header within that same section of the site’s settings. Find the line labeled “Daily agenda,” then click the box next to it that says “None” and change it to “Email.” Your new daily summary will now arrive at 5:00 every morning, courtesy of the virtual calendar genie who’s been waiting for your wish all this time.
(31)

