3 CAD Functions to Understand for Building Your Prototype
3 CAD Functions to Understand for Building Your Prototype

Understanding the basics of CAD (Computer-Aided Design) modeling was crucial in building my first working prototype. At this point, I’m close to filing a patent. None of it would have been possible, though, without understanding three crucial functions present in a lot of the software available out there. Here are three CAD functions to understand for building your prototype.
Once you understand the following 3 CAD modeling functions, your ideas will come to life sooner than you think.
Quick Insights On Prototyping with CAD
Using CAD for engineering has been around since the late 1950s. It wasn’t until the mid-1990s, though, that producing 3D models on a personal computer became widely available.
The best alternative before doing it yourself was contracting with a design firm (unless you had access to the resources that they did). Well-known entrepreneurs like Joy Mangano spent small fortunes bringing their products to life back when they were starting out.
In Mangano’s case — it was $ 100,000 for the development process of the Miracle Mop — clear back in the early ’90s.
Things Are Different Now
The good news is that now there are a ton of free open-source software options on the internet for CAD modeling.
Some commercial-grade software even has a free option until you hit a certain revenue threshold with your product (like the one I use).
These software options work great if you’re on a shoestring budget and need to build something yourself.
Plus, this is a near risk-free approach compared to borrowing a bunch of money and having deadlines to pay people back.
Real-Life CAD Example
David Barnett, the inventor of PopSockets, leveraged a partial DIY strategy in the early days of his company. After working through 60 prototypes by himself, he eventually saw the product take-off (not without a few ups and downs along the way, though).
Barnett used a design firm for a phone case that was part of an early Kickstarter campaign.
That cost him a little over $ 100,000. However, he perfected the PopSocket accordion mechanism (the backbone of the product) by himself with the CAD program Solidworks.
Today, Barnett’s company has seen years where revenues have reached as much as $ 200 million (2018). In this interview with Mixergy, he briefly touched on how simple it was to draw out a sketch and get started.
Sketch
A sketch lays the groundwork for your CAD models. If you want to build something similar to the many widely available consumer products on the market, start with a sketch. Plus, you probably already have a few doodles in your notebook of what your ideas are.
It’s just a matter of drawing them out on-screen and deciding the specific measurements. Don’t worry if you aren’t great at math. I personally struggled through geometry until the last painful final exam in my sophomore year of high school.

Creativity Finds A Way
It may sound funny or weird, but, if you have the idea clear enough in your head, your brain will probably figure out how to navigate most CAD software.
Plus, there are plenty of available tutorials on the internet. The sketching just involves clicking and dragging, anyway. Use a 12-inch ruler with millimeters on it to figure out the current dimensions of the sketches in your notebook.
Using your ruler will make drawing your designs out on the screen a lot easier.
Once you have a digital sketch that looks like what you need, you can start experimenting with making that sketch three dimensional.
Extruding A CAD Model
When you create a virtual 3D object out of a sketch, you are “extruding” it.
There might be other words for the same action in different software toolbars, like “press pull” or “push-pull,” for example.
“Extrude” means “to force or push something out of something,” according to Oxford Learner’s Dictionary. The nice thing about everything being virtual is that you can extrude shapes from your sketches at whatever distance you want and make changes immediately if things don’t look the way you thought they would.
Any shape can be extruded, as long as the sketch is drawn appropriately. Multi-faceted objects will require a more complex sketch to create, though.
Sketch In, Sketch Out
You can draw sketches within other ones (for those complex objects) and choose to extrude very specific tiny parts if needed.
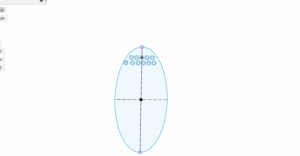
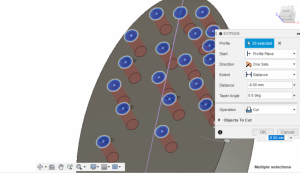
For example, if you were designing a toothbrush head, there would likely be a large oval sketch with many tiny circle sketches inside of it for the bristle holes. After extruding the main brush head whichever distance makes sense, you can decide the depth for extruding each hole.
My thoughts for the drawing are to extrude the same amount of depth for each hole all at once. Here’s what that would look like:

After you arrive at a design that you think works to 3D-print and play around with, it’s time for the last step.
Save the CAD As “.STL”
If you have a 3D-printer or know where to send your object (like a printing service) you will need to save it in the “.STL” format and send it there.
Some CAD software may have a menu option that says you can print directly, but, I’ve found it easier to just save the file.
The .STL file format stands for “Stereolithography” and is the standard format for desktop 3D printing. The file will need to be opened in the software that controls your 3D-printer.
There are a lot of free options out there for that, too.
The printer software will convert the STL file to G-code so your printer can understand it. G-code is the standard language used by 3D-printers.
Since each CAD modeling software and 3D printing software will be a little different, each will have its own unique parts to navigate. The 3D printers menus should be pretty straightforward, though, and it will probably be quick and easy getting your design sent to a printer. I usually ask someone who has done this before to help me set up.
Depending on the complexity of your design, I can’t promise the printing of the object itself will be a quick process. Even reasonably simple designs take time to print in those 3D printing beasts — but it is so fun and rewarding to see the finished product.
Sacrificing Time For Money
Even if it takes a long time to print (8+ hours is long to me), 3D printing is still by far the best way to build a prototype without much money.
Contracting with a professional firm could cost anywhere from $ 10,000 and up, as past entrepreneurs have experienced. If your goal is to build a prototype that works enough to prove the concept, this is the way to go.
However, I’ve printed some fun stuff by just asking around who owns a 3D printer and have been able to use one in a friend’s office. Ask around and try to find one.
Tying It All Together
Once you understand the basics of CAD modeling, you will be well on your way to making your own project.
Sketching it out, extruding, and saving the file in “.STL” format are the basic steps to take in order to get something tangible off the bed of a 3D printer.
If you do create a physical prototype of something unique and new that solves a problem, make sure to take the time for filing a patent (or at least a provisional patent) before telling the market about it.
The post 3 CAD Functions to Understand for Building Your Prototype appeared first on ReadWrite.
(75)

