7 Ways to Boot Windows 10 in Safe Mode
If you want to start Windows 10 in Safe mode, but the conventional “F8 Windows boot” method isn’t working? Don’t worry, you are not alone in this. Believe me when I say that almost every Windows 10 user has faced the same issue after upgrading from any previous Windows Operating System. To solve your problems, we have created this article which will show you seven ways to start Windows 10 in Safe Mode. We will show you how to enable Safe Mode with Networking and Safe Mode with Command Prompt. Before starting with the solutions, let’s go through a brief introduction.
Contents
- 1 What is Safe Mode in Windows 10
- 2 Why do You Need to Boot Windows 10 in Safe Mode?
- 3 What is Safe Mode with Networking?
- 4 What is Safe Mode with Command Prompt?
- 5 How to Boot Windows 10 in Safe Mode
- 5.1 1. Start Windows 10 in Safe Mode Using System Configuration tool
- 5.2 2. Boot in Safe Mode Using Key Combination
- 5.3 3. Boot Windows 10 in Safe Mode Using Recovery Settings
- 5.4 4. Start Safe Mode Using Windows 10 Installation Disc/Drive
- 5.5 5. Boot in Safe Mode on Windows 10 Using Recovery Drive
- 5.6 6. Start Windows 10 Safe Mode Using Automatic Repair Mode
- 5.7 7. Start Windows 10 in Safe Mode Using F8 + Shift

What is Safe Mode in Windows 10
Safe Mode is like a different user profile on your computer, but with a lot fewer features. When Windows 10 starts in Safe Mode, it loads a minimum set of files, drivers, and applications, which are required for it to boot. In short, only the basic configuration is loaded. Your desktop will not have your stylish wallpaper. The fonts and icons will look big and less sharp. The words Safe Mode will be written on all four corners of the screen, and your Windows version will be written at the top center. Your speakers won’t work, as its driver won’t load. You will have access to your files, you can use your mouse and keyboard. This is what the Safe Mode looks like. There are many more changes you may notice in Safe Mode from a standard boot.
Let’s take a look at some of those:
- Most of the drivers are not loaded. So, most of the hardware doesn’t work when your Windows 10 boots in Safe Mode.
- System’s default graphics driver won’t be used. Safe Mode uses the standard VGA graphics mode.
- Hardware for sound, the internet, mic, etc. won’t work in Safe Mode.
- You will be able to use PowerShell, Command Prompt, Computer Manager, Event Log Viewer, Device Manager, etc.
- Microsoft’s own web browser Edge won’t work in Windows 10 Safe Mode. You can use Microsoft’s old browser Internet Explorer here.
One must be wondering when almost nothing works in Safe Mode, why so much drama? What is the use of Safe Mode? Let’s check it out then!
Why do You Need to Boot Windows 10 in Safe Mode?
You might have already faced when we install a new software or add drivers for some new hardware, the system just freezes or crashes. This is where the use of Safe Mode comes into play. This is actually a special way of our OS to load when there has been an error to the level of being critical. With Safe Mode, now you get to troubleshoot Windows and find what went wrong. In Safe Mode, you can find the reasons behind your system’s crash or any other issues. You can also use System Restore or check for virus using the antivirus to remove malware. It is safe and best practice to do this in Safe Mode because your system is using minimal essential services and drivers, which makes your system faster and less susceptible.
There are two other types of Safe Mode as well – Safe Mode with Networking, and Safe Mode with Command Prompt. Let’s read about them.
What is Safe Mode with Networking?
Safe Mode with Networking is just like the standard Safe Mode, but with one extra set of drivers loaded. Here, the Networking drivers are loaded, which allows your computer to connect to the Internet and every other network. Although you can open your browser and use the internet, it is recommended not to surf the web on Safe Mode. In Safe Mode, your computer is actually in an unprotected and vulnerable state. So, use the internet in Safe Mode with Networking to visit safe websites only.
What is Safe Mode with Command Prompt?
In this mode, the computer doesn’t boot in the standard Windows GUI. Here, you will be taken directly to a Command Prompt window. Meaning, there will be no Desktop or Start Menu for you to access. And that’s why it is only used by experts to carry out advanced troubleshooting.
How to Boot Windows 10 in Safe Mode
Now that you know all about the Safe Mode, let’s see how to boot your Windows 10 Safe Mode. We recommend you to check out all the seven ways, the more you know, the better.
1. Start Windows 10 in Safe Mode Using System Configuration tool
This is one of the easiest ways to boot Windows in Safe Mode. It is commonly known among the users by its executable name msconfig.exe.
Step 1. Press Windows logo key + R to open Run dialog box. Type msconfig.exe and click OK.

Step 2. In the next Window, select tab Boot. Now, at the left bottom, under Boot Options, select Minimal, and click OK.
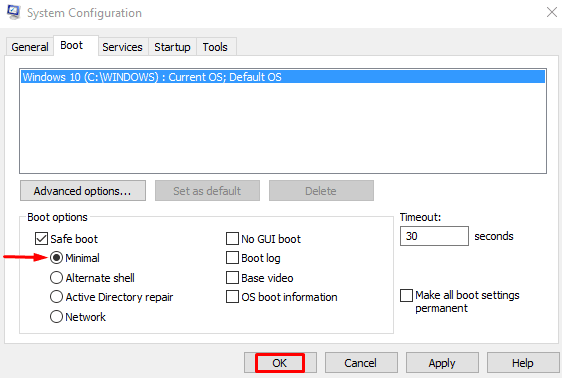
Step 3. A dialog box will open up. Here you can select to restart and boot into Safe Mode immediately or to do so later. If you still have some work to finish, click Exit without restart. If you are ready to access Safe Mode, select Restart.

After the last step, your system will restart Windows 10 in Safe Mode.
2. Boot in Safe Mode Using Key Combination
This one seems easier than the last method to boot Safe Mode in Windows 10, and has more options. Using this method, you can also boot into Safe Mode with Networking and Safe Mode with Command Prompt.
Step 1. Press Windows logo key or go to Start menu. Click Power button.
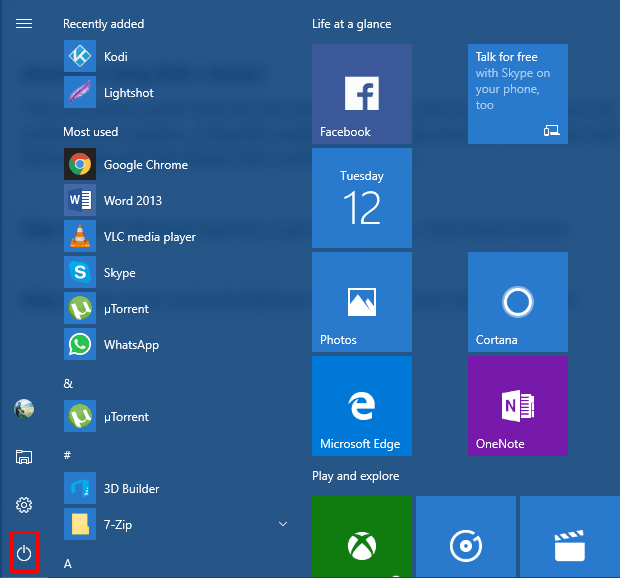
Step 2. Now, press and hold Shift key on your keyboard, and click Restart.
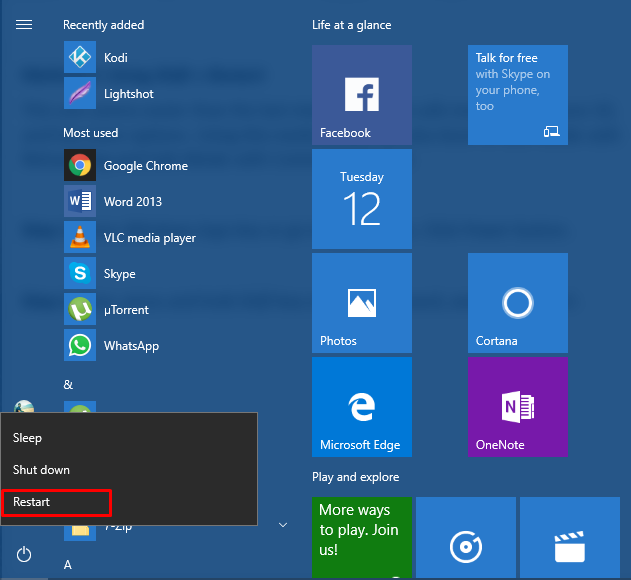
Note: The above two steps can also be performed from the Welcome or Sign In screen, by clicking the Power button and then using Shift + Restart.
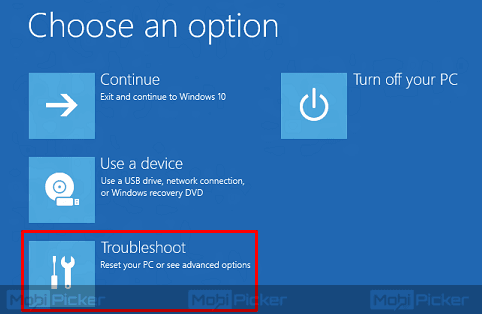
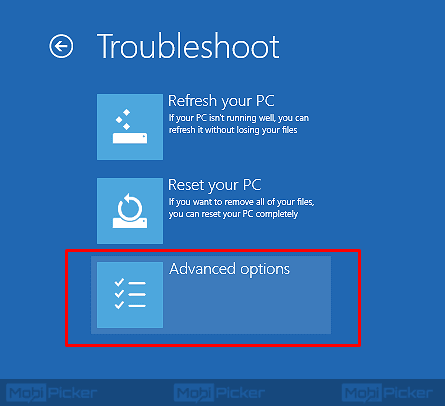
Step 3. Now you will see a blue screen, with three options. Select the third one Troubleshoot.
Step 4. In next screen, select Advanced options.
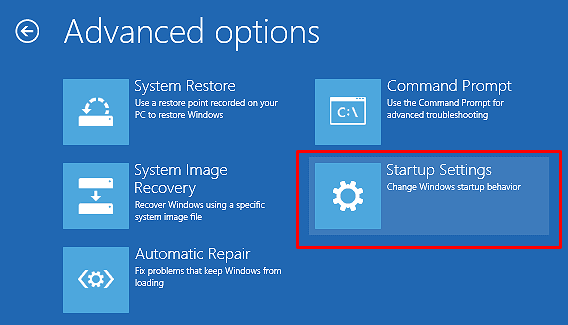
Step 5. In this screen, you will have to select Startup Settings.
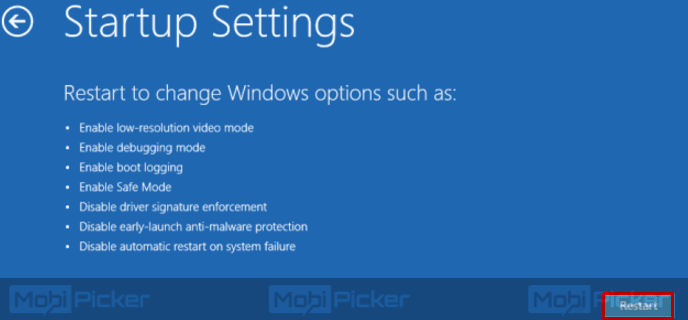
Step 6. Now, in the Startup Settings, you will see what you can change after restarting your Windows. This list also includes Safe Mode. At the bottom right corner, there will be a Restart button. Press that button.
Step 7. Your computer will restart, and will present you a blue screen with 9 options. Here, you can choose to select which Safe Mode you want to access. To enable the standard Safe Mode, press 4 or F4 on your keyboard. To enable Safe Mode with Networking, press 5 or F5. To enable Safe Mode with Command Prompt, press 6 or F6 on your keyboard.
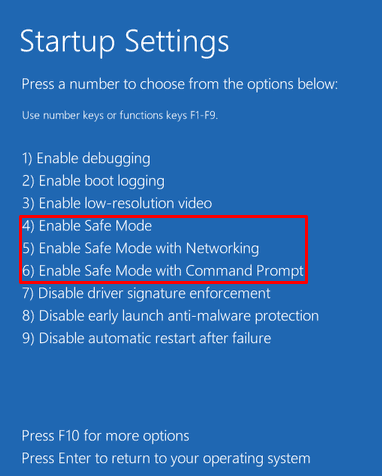
After selecting the desired Safe Mode to access, Windows 10 will boot to that specific type of Safe Mode.
3. Boot Windows 10 in Safe Mode Using Recovery Settings
This is another method to access Safe Mode. Using this method as well, you can boot to any type of Safe Mode.
Step 1. The first step is to open Settings app. There are two ways to do it. You can go to Notifications (right corner of the task bar), and then select All Settings. Or, you can simply press Windows logo key + I.
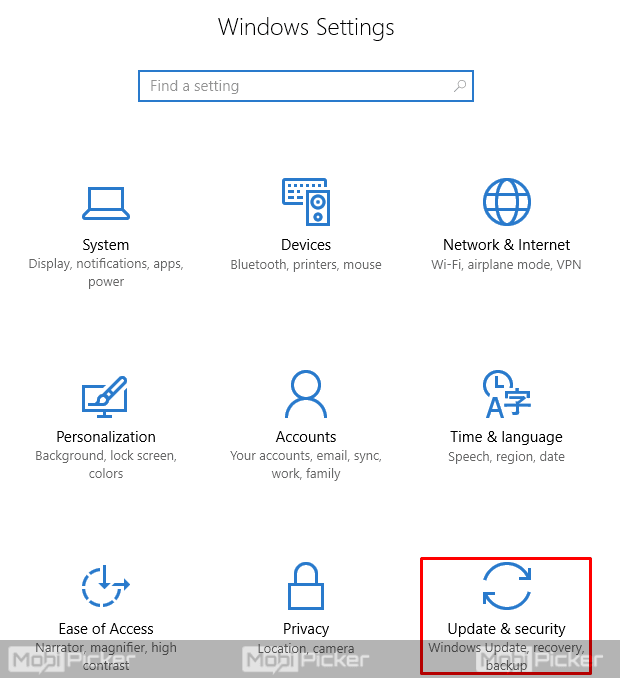
Step 2. In Windows Settings, select the last option Update & Security.
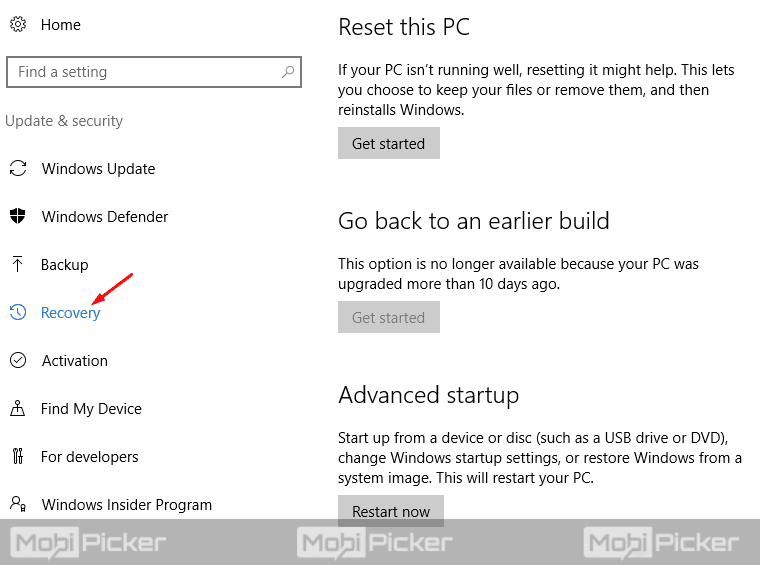
Step 3. From the left sidebar, select the tab Recovery.
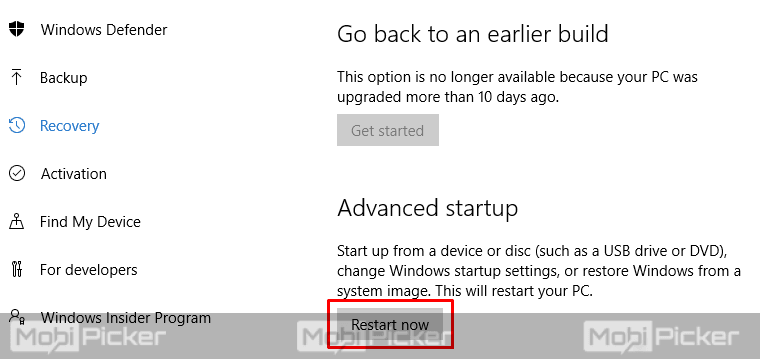
Step 4. Under Recovery settings, Click “Restart Now” in Advanced Startup section.
Step 5. Now your computer will restart, and boot to a blue screen. You will see three options. Select the third one Troubleshoot.

Step 6. Now select Advanced options.

Step 7. In this step, select Startup Settings.

Step 8. In this next screen, press the Restart button at the bottom right corner of the screen.

Step 9. After your computer restarts, the same blue screen with 9 options will open which you saw in the previous method. In this screen, you will see all three types of Safe Mode mentioned. Press 4 or 5 or 6 as per your need, and Windows 10 will boot in Safe Mode accordingly.

After selecting the type of Safe Mode you want to access, Windows 10 will start in Safe Mode.
4. Start Safe Mode Using Windows 10 Installation Disc/Drive
This method is for users who have a Windows 10 Installation Disc or a USB memory stick. If you don’t have one, read how to create bootable USB drive for Windows 10. When you are ready with your Windows 10 Installation Disc/Drive, you can use to boot your computer into Safe Mode. This method is very successful among the computers which are unable to boot the installed OS at all or are broken. Follow steps below to boot into Safe Mode using Windows 10 Installation Disc/Drive.
Step 1. Insert Win10 Installation Disc/Drive, and wait for it to load. After it loads, choose your preferred language and keyboard layout. Now click Next.

Step 2. On the next screen, at the bottom left, you will see a repair your computer. Click that button.

Step 3. Now a blue screen will open. Select Troubleshoot here.

Step 4. On this next screen, select Command Prompt.
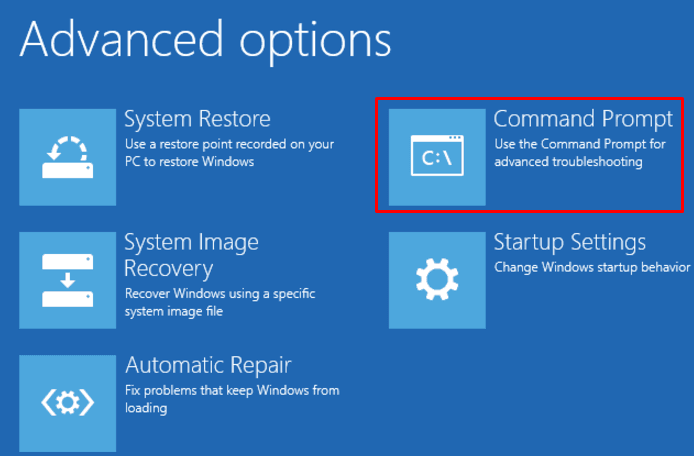
Step 5. Now you will see a command prompt window opens up. Write the exact command written below and press Enter.
Bcdedit /set {default} safeboot minimal
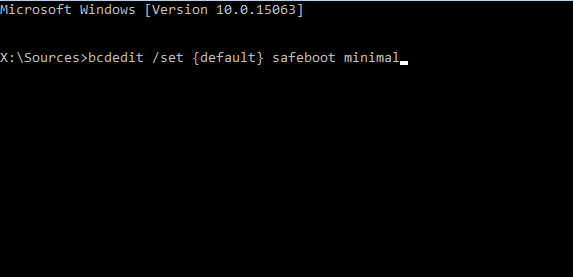
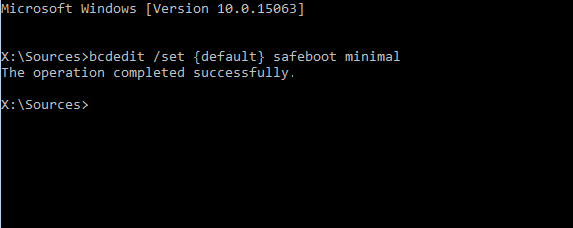
Step 6. After the last step, you will see a new message on command prompt window: “The operation completed successfully.” Now close the command prompt window.
Step 7. Select Continue on the blue screen.
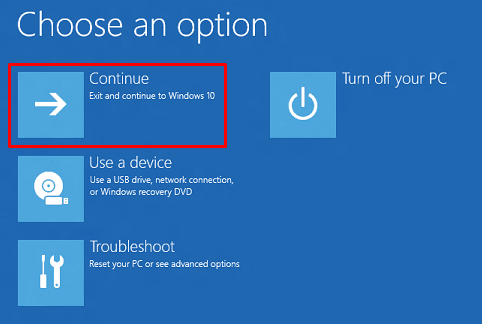
Now your computer will reboot into Safe Mode automatically.
5. Boot in Safe Mode on Windows 10 Using Recovery Drive
You can create a Recovery Device in Windows 10 from the Recovery Drive app. Before beginning with this method, you will need to create a USB Recovery Device. Get a flash drive or an external HDD.
Step 1. Once you are done creating a USB Recovery Drive, use it to boot your Windows 10 computer, and load its content.
Step 2. After the contents are loaded, on the first screen, you will be asked to choose the layout of your keyboard. Select the one you want to use.

Step 3. After selecting the keyboard, you will be taken to the next screen. Select Troubleshoot in the screen.

Step 4. Now you need to select Advanced options.

Step 5. Select Startup Settings on this screen.

Step 6. On Startup Settings screen, press Restart button.

Step 7. Now your Windows will reboot to another blue screen. Here, among the 9 options, you can boot Windows 10 in Safe Mode by pressing 4 or 5 or 6 depending on your requirements.

After the last Step, Windows 10 will start in Safe Mode.
6. Start Windows 10 Safe Mode Using Automatic Repair Mode
In Windows 10, if the computer is unable to boot the operating system normally, for consecutive 3 times, then it enters Automatic Repair Mode on the fourth turn. From Automatic Repair Mode, you can boot Windows 10 into Safe Mode.
Step 1. To access Automatic Recovery Mode, you will have to interrupt the booting process of your computer three times consecutively. To do this, you can use the Power or Reset button on your PC while it boots to stop the boot process. While using the Power button to interrupt, you may have to press and hold the button for at least 4 seconds. If you see this screen with Preparing Automatic Repair written on it, then it is a confirmation that the booting has been interrupted three times successfully.
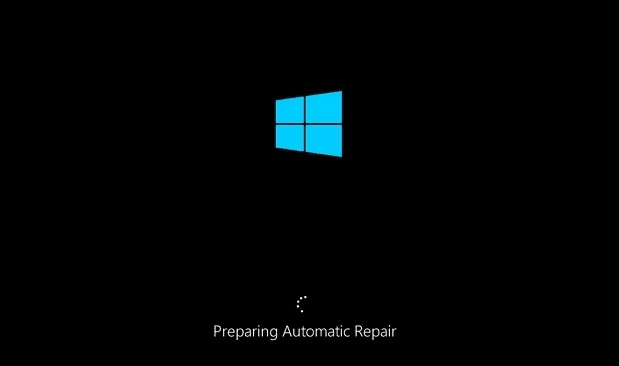
Step 2. Now, wait as Windows 10 runs automatic diagnosis on your system.

Step 3. Soon an Automatic Repair page will open. Select Advanced options in it.

Step 4. Select Troubleshoot on the next screen.

Step 5. In next screen, select Advanced options.

Step 6. In this screen, you will have to select Startup Settings.

Step 7. Now, in this screen of Startup Settings, you will see what you can change after restarting your Windows. This list also includes Safe Mode. At the bottom right corner, there will be a Restart button. Click that button.

Step 8. Now your computer will restart. When the system is done rebooting, another blue screen will appear with 9 options. Here, you can choose to select what type of Windows 10 Safe Mode you want to access. Press F4 for standard Safe Mode, F5 for Safe Mode with Networking, and F6 for Safe Mode with Command Prompt.

7. Start Windows 10 in Safe Mode Using F8 + Shift
As we mentioned in the beginning, in Windows 7, we were able to access the Safe Mode pretty easily by pressing the key F8 while the Windows loaded. After which, an Advanced Boot Options window used to open and from there we could select Safe Mode. That was the old way to boot to Safe Mode.
Though F8 doesn’t work the old way, it is still useful. There is another way you can boot your Windows 10 in Safe Mode using Shift + F8 while the Windows loads. It will take you to recovery mode where you can select Safe Mode.
BUT, the problem is, this process doesn’t work in every system. Here I’m mentioning “system” and not Windows 10, because the success rate of this method depends upon how fast is your computer. Back in 2012, Microsoft posted a blog about this issue. They explained that Windows 8 and later versions of Windows boot up too quickly that there is no time to detect keystrokes like F8 which can result in the interruption of the booting process.
So, if you are using a system with modern hardware and it uses a fast SSD drive, along with UEFI BIOS, then you cannot access the Windows 10 Safe Mode using F8 or Shift + F8. This process can work in the slower systems without any trouble.
Conclusion
Windows 10 is a very popular operating system. Sure, it took some time for Microsoft to gain people’s confidence, but in the end it won. We have explained all the possible methods which should help you boot Windows 10 in Safe Mode. If you have any questions, comment below.
The post 7 Ways to Boot Windows 10 in Safe Mode appeared first on MobiPicker.
(45)

