DNS Server Not Responding on Windows 10, 8, 7
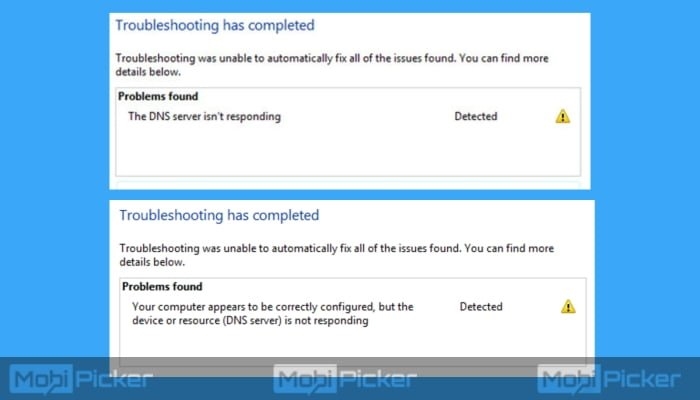
So your internet is not working anymore due to some glitch in Network Adapter. And when you tried to troubleshoot, it says “The DNS server isn’t responding” OR “Your computer appears to be correctly configured, but the device or resource (DNS server) is not responding.” If this is the error you are facing on your Windows 10 / Windows 8 / Windows 7 PC, you are reading the right tutorial.
First of all, let me assure you that you are not the only person facing this uninvited error. We have received several queries from our readers; hence, we are writing this complete step-by-step guide to fix it. The DNS server isn’t responding is a common error, which has been seen to cause internet connection problems across different Windows OS. In this guide, we will show you how to fix DNS server not responding in Windows 10, Windows 7 and Windows 8. Before explaining the methods, let’s first go through a brief introduction.
Contents
- 1 Introduction
- 2 What is the DNS Server Not Responding Error?
- 3 How to Fix DNS Server Not Responding?
Introduction
A computer without internet connection is pretty useless nowadays. Without the internet, there would be no emails, no Facebook, no chatting, and no office work as well. Almost every business is one way or another dependent on the Internet. And just like every other wired or wireless connection, there can be errors in internet connection as well. Errors in connecting to the Internet can be very frustrating. Imagine it’s the last date to submit that project, which took weeks for you to complete. And at the last minute, you are unable to connect to the Internet.
DNS Server isn’t responding is one of the many errors which leads to no internet connection. Errors like these happen mostly due to hardware problems, which can be very complicated to solve. But don’t worry, you can fix this error very easily by following some simple methods. First, let’s see what exactly is thisDNS error, and why does it happen.
What is the DNS Server Not Responding Error?
The term DNS stands for Domain Name System, and it manages IP addresses. Every computer and website have its own IP address. As it is next to impossible for a human to memorize every website’s IP address, DNS was invented to do so. In simple terms, computers use IP addresses to connect with each other, which is managed by DNS, allowing computers to connect quickly.
Now, if the DNS server not responding, your computer will be unable to connect to any website. Why? Because DNS server works like a phonebook directory, which has website names and their IP addresses. And if you are unable to access the phonebook directory, how will you connect with websites without their IP addresses. DNS server is a pretty crucial component of the internet. If a DNS server isn’t responding, it means no internet connection.
How to Fix DNS Server Not Responding?
As we are clear about DNS and DNS server, let’s go through the solutions to fix DNS Server isn’t responding problem. We can solve this error with three methods. It isn’t necessary to try each method. Try the first one, and if it doesn’t work for you, then try the next one.
Note: The same solutions and their steps apply for Windows 7, Windows 8 and Windows 10.
Method 1: Correct TCP/IP Settings
In most cases we can fix this DNS error by checking and correcting your TCP/IP Settings. Follow these steps to do so:
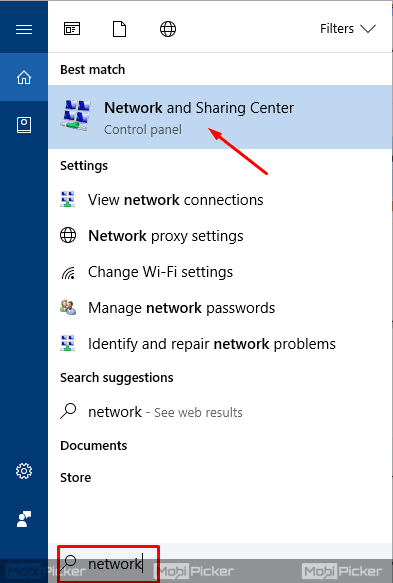
Step1. Go to Start menu and type Network in the search box. Open Network and Sharing Center from results.
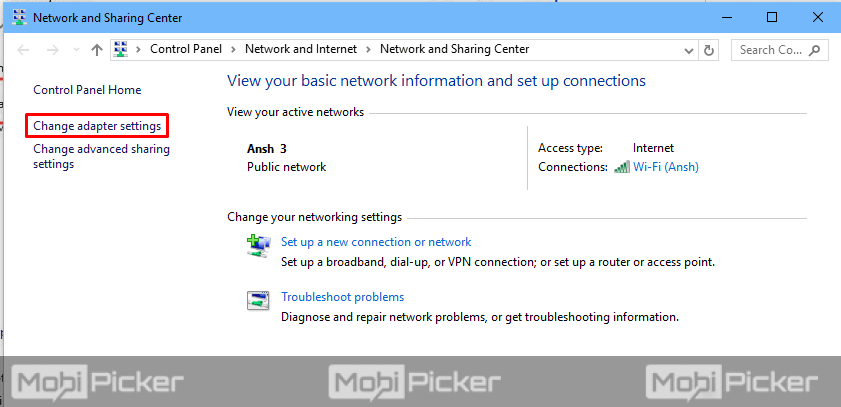
Step 2. On the left Sidebar, you will find Change adapter settings. Click on it.
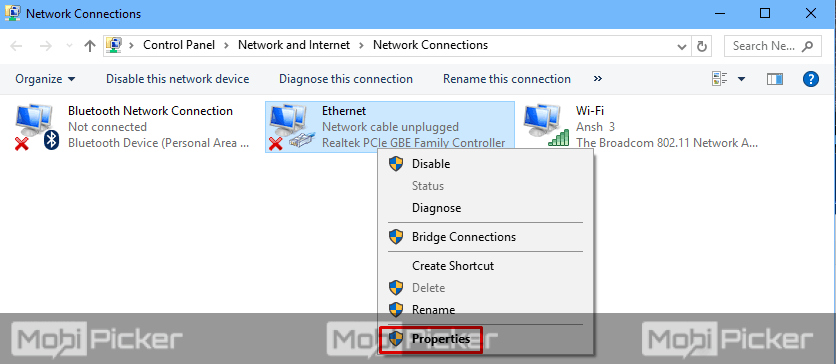
Step 3. Now you will see different active and inactive connections. Right click on Ethernet or Local Area Connection, according to your Windows’ version, and click Properties.
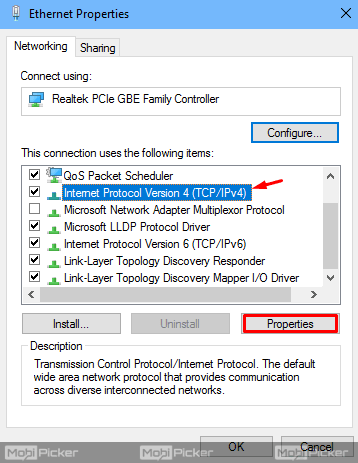
Step 4. After the last step, a dialog box will open. Here you will need to click on Internet Protocol Version 4 (TCP/IPv4), then click Properties as shown below.
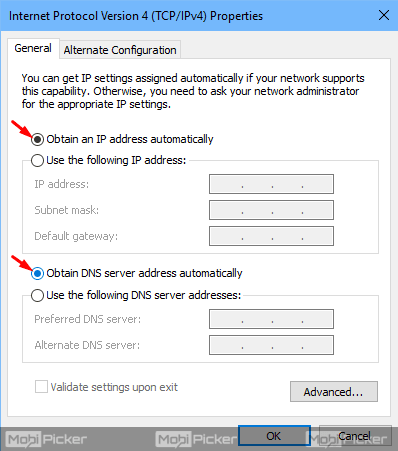
Step 5. In the next dialog box, tick on Obtain an IP address automatically and Obtain DNS server automatically, and click OK.
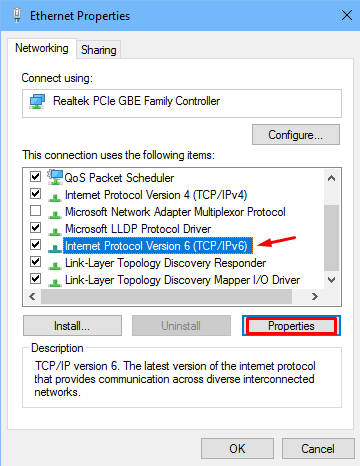
Step 6. Now, as we did in Step 4, in this step you need to click on Internet Protocol Version 6 (TCP/IPv6). Then click Properties.
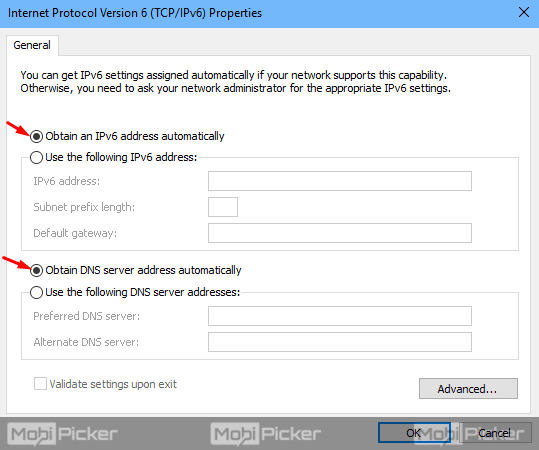
Step 7. In this dialog box, tick on Obtain an IPv6 address automatically and Obtain DNS server automatically, and click OK.
Step 8. This will most probably solve your problem. If the DNS server is still not responding, perform the next method.
Method 2: Use Ipconfig Commands
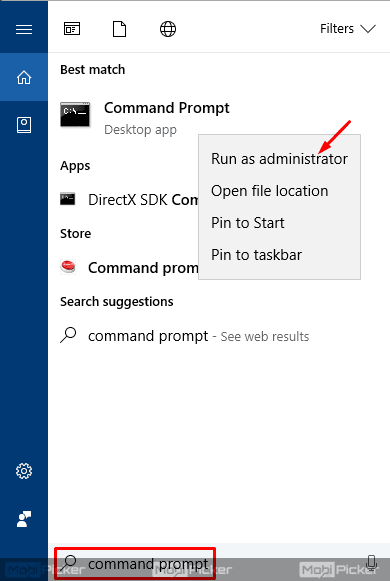
Step 1. Go to the Search box at Start menu, and type Command Prompt. Now, in results, right click on Command Prompt and click Run as administrator.
Step 2. The last step will open a black window. Now, you have to type the commands mentioned below, and press enter after each command.
ipconfig /flushdns
ipconfig /registerdns
ipconfig /release
ipconfig /renew
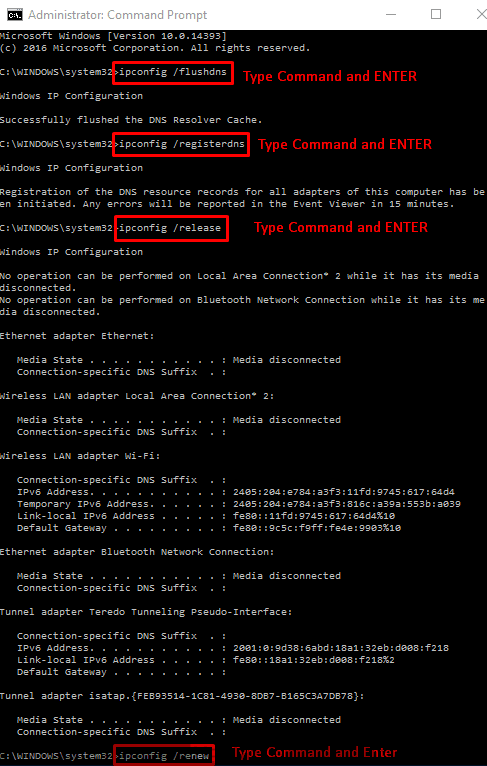
Step 3. Try reconnecting to the Internet. In most cases, the error should be fixed by now. If you still see the DNS Server isn’t responding on Windows 10 /7 /8, then perform the next method.
Method 3: Install Latest Network Adapter Drivers
Drivers are the most important part of any hardware. Your computer’s Network Adapter relies on its driver too. The DNS Server isn’t responding on Windows 7, Windows 8 or Windows 10 can be the result of a faulty or outdated driver.
Before beginning this method, first, you will have to visit your Network Adapter’s manufacturer’s website. Now download the latest driver for your computer’ Network Adapter. As the error is not letting your computer connect to the Internet, download the drivers on another system. After downloading the files, transfer them to your computer and install the drivers.
For better results, Uninstall your network adapter’s drivers first, and then Install the latest ones. Follow these steps to do so:
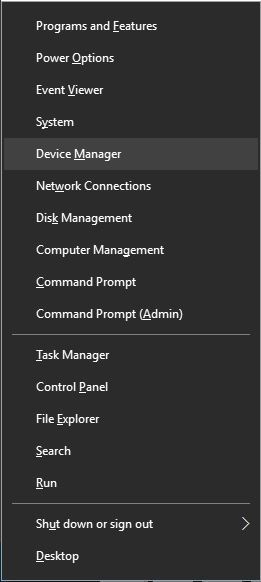
Step 1. Press Windows logo key + X, and click Device Manager.
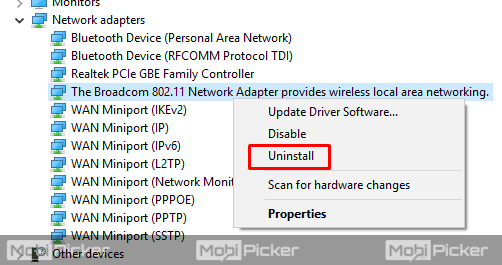
Step 2. In Device Manager, expand Network Adapters and right click on your adapter’s name. Then click Uninstall.
Step 3. A confirmation dialog box will open. Click OK on it. In Windows 7, you will need to check Delete driver software for this device before clicking on OK.
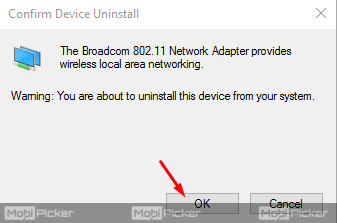
Step 4. The last step will Uninstall your Network Adapter’s old drivers. Now, restart your computer.
Step 5. As soon as the computer starts, the default network drivers will be installed automatically. This should solve your problem.
Step 6. If you still see the error, install the latest drivers which you downloaded on another computer. Now check your internet connection.
Conclusion
DNS Server isn’t responding on Windows 10, Windows 7, and Windows 8 is very common for the Internet users. It prevents your computer from accessing the Internet. If you follow the above methods, your DNS server should respond without any issues. If you could not fix the problem, do not hesitate to comment below. We are here to help you.
Other DNS Related Errors
The post DNS Server Not Responding on Windows 10, 8, 7 appeared first on MobiPicker.
(101)

