FIX: Service Host: Local System (Network Restricted) High Disk Usage in Windows 10
If you are facing high disk/CPU usage problems by Service Host: Local System (Network Restricted) on Windows 10, you are not the only one. Reportedly, many users noticing Service Host Local System high disk usage in task manager nowadays. In this article, we are going to explain what is the purpose of Service Host Local System, why is it getting messed up, which problems does it produce, and how to fix them. We have also covered how to fix 100 % disk usage on Windows 10, if that is the specific problem you are getting.
What is Service Host Local System?
Service Host is a container that stores generic services. There are several types of Service Host containers, such as Service Host: Local system, Service Host: Local Service, Service Host: Network Service, etc. There are lots of them, and all of them are important to the operating system to run properly.
Generic services that are stored in those containers are actually DLL files. Earlier these DLL files were actually executable (EXE) files, and they didn’t create problems that users are facing nowadays, but they were not efficient because they were unable to do code reusability on the effective way, and each executable file had to be started. This architecture would lead to the slower system. DLL files do not need to be opened like executables, and Service Host containers are taking care of their proper work. In this way, Service Host acts like a parent to generic services.
When some Service Host starts doing problems, it is actually some of the generic services that are probably corrupting rest of services, which ends with problems where operating system alarms users about broken Service Host container.
Service Host Local System is in charge for recognizing if an update is needed to be done, and uses the internet to do Windows update in the background. There are lots of compliments around Service Host Local System (Network Restricted) task and users usually complain about high CPU, high memory usage, and high disk usage.
How to Fix Service Host Local System High Disk Usage in Windows 10
If you are struggling with high disk usage on Windows 10, you are now at the right place. There are several ways to fix Service Host Local System, so follow our steps. Note that each system is different so it doesn’t mean it will be fixed in the same way.
Disable Automatic Updates
We already mentioned what Service Host Local System is, and how it handles updates in the background. If you are not windows 10 Home user, try disabling automatic updates and things could get better. Windows 10 has automatic updates system and Microsoft’s goal is to make it harder for a user to disable them because updates catch those who use piracy version. Here’s how you can do it.
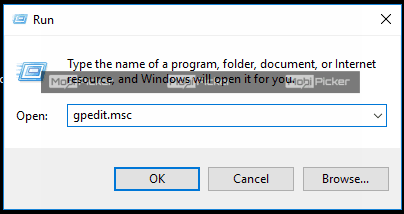
1. Press Start and enter “Run“. Write “gpedit.msc“, and click OK or press Enter.
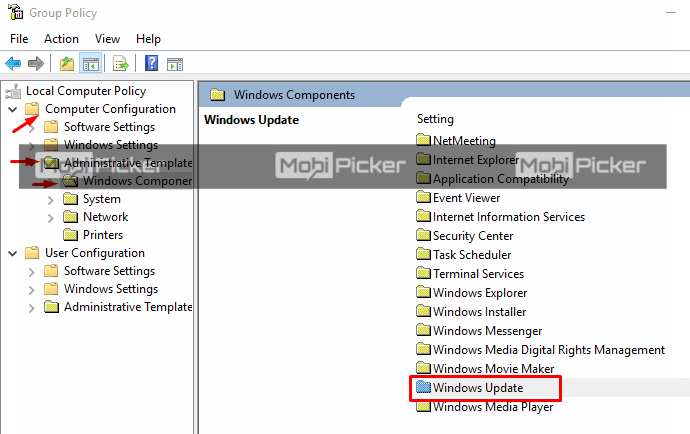
2. Local group policy editor should show up, and browse the following path: Computer Configuration\Administrative Templates\Windows Components\Windows Update.
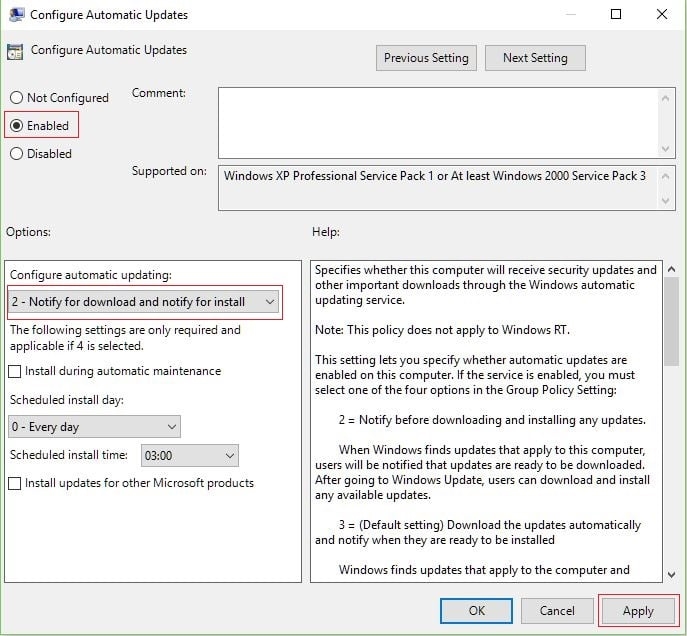
3. After that, double-click on “Configure automatic updates“. Check “Enabled” option, and in dropdown select “Notify for download and notify for install“. Click “Apply“, and restart your computer.
If you find high disk/CPU usage resolved, it means that Service Host Local System did an automatic update in the background that was somehow corrupted and the computer started facing issues. If it the problem still exists, check out the next solution.
Restore System Health
To restore system health on your Windows 10 PC, follow the steps below.
1. Open the command prompt (Admin). Just press Windows+X for quick access screen, and select “Command Prompt (Admin)“.
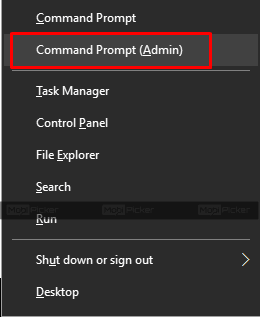
2. When Command Prompt opened, Enter “sfc /scannow“. This command will make a system scan and problem that you face could be recognized.

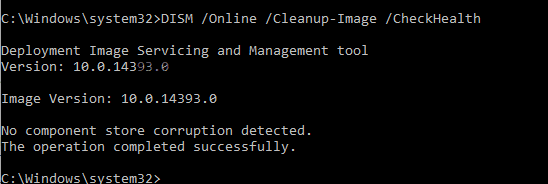
3. When scan is done, run the command “Dism/Online/Cleanup-Image/RestoreHealth” in Command Prompt. After it is done, restart the computer and check if the problem is persistent.
Disable Superfetch Service
Lots of users get things working by disabling service host Superfetch. If you are not aware how to disable Superfetch service on Windows 10, follow the instructions below.
1. Open start, type “services” and open it. If services do not show up, you can open it with Run too. Type “run“, or just combine windows key + R on your keyboard. When Run is opened, write “services.msc“, and press Enter.
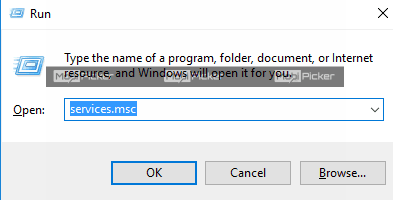
2. Scroll down until you find “Superfetch” service.

3. Right-click on Superfetch, and select “Properties“. Click “Stop“, expand drop-down, and click “Disabled“. Select “Apply“, and restart your computer.
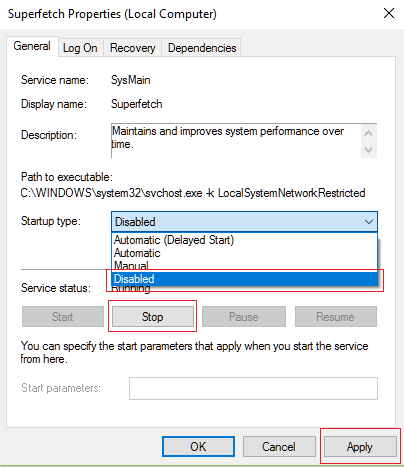
Problems with Service Host Local System high disk usage, or high CPU usage should be resolved. If they are not, take a look at step four.
Scan computer with trusted software
If the problem is still here, try installing some trusted software like CCleaner, which is specialized in fixing corrupted registry files. If there were corrupted files connected with this issue, and if they get fixed, you should not have this problem anymore.
Conclusion
If you follow the steps as mentioned above, your problem of Service Host Local System high disk usage on Windows 10/8/7 should be fixed without any issues. However, being a rare case, if the problem still exists even after followed all the solutions stated above, comment below your detailed issue. We will check and provide you with possible solution.
The post FIX: Service Host: Local System (Network Restricted) High Disk Usage in Windows 10 appeared first on MobiPicker.
(162)

