How to Delete Skype Account Permanently
If you are wondering how to delete Skype account, you are on the right page. Many people want to get rid of their old Skype account or just want to stop using Skype’s services. But they don’t know how to close Skype account. It’s a pretty hectic process and confusing too. But don’t worry, we will guide you through it.
Skype has been with us for a very long time. It was first released in 2003, and later it was acquired by eBay in 2005. Since then, it changed a few hands and landed into Microsoft in 2011. Skype was already a pretty big thing by then, but Microsoft gave it a bigger platform. Skype actually allows its users to communicate with each other using video chat and text chat, along with conferencing and file transfers. It can also be used to call on phones, which is a paid service. Skype also launched their own phone, Skype Phone, in 2007. It was another big success for Skype. Currently, it is available across all platforms including Windows, Mac, Android, and iOS.
Many users have been using it for more than a decade. Some of them want to delete their Skype account due to different reasons. However, Microsoft has made deleting Skype accounts pretty convoluted, than it was ever before. It’s understandable that no social media service or any internet service provider will advertise the account deletion button on their homepage. But, deleting a Skype account permanently is a pretty long and multi-step process. From deleting payment methods to canceling subscriptions and more, it all needs to be done separately. Let’s take a look at how all this can be done.
Where is Delete Option on Skype Account?
Well, there is no button as to delete your Skype account. It actually requires you to contact Microsoft, and they will delete it for you. Do not worry, contacting Microsoft is not a long process. You can simply contact them and ask them to delete your account. Sounds simple? The catch here is things you need to do before contacting them.
Requirements for Closing Skype Account
Before you start the process to delete your Skype account, there are certain things you need to do. Check out below.
- Unlink your Microsoft account from Skype account
- Request a refund and cancel any subscriptions
- If you are using Skype Number, cancel it.
- Remove auto-renew feature from recurring payments.
- Change mood message.
- Change status to invisible or offline mode
- Sign out your Skype account from all the devices
- Delete any and every personal detail from your Skype profile.
How to Delete Skype Account Permanently
As you have seen the things you need to do before starting the deletion process, we will now help you through them. Follow below-given steps to delete Skype account permanently.
1. How to Unlink Microsoft Account from Skype
The first point here is unlinking your Microsoft account from Skype account. There are many users who use and signed up Skype using their Microsoft account. If you are one of them, then deleting your Skype account will also delete your Microsoft account. Meaning, if you are using that Microsoft account for other services like OneDrive, Xbox Live, Outlook, and any other services, you’ll lose access to them too. This is why it is important for people using a Microsoft account to unlink them. Here’s how to do it:
Step 1. Open your web browser and go to Skype.com. Log-in to your account.
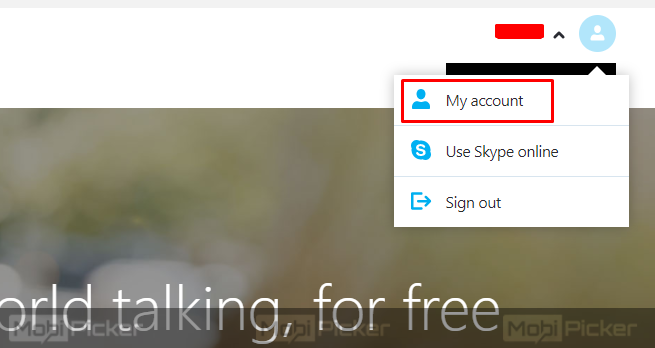
Step 2. Go to My Account.
Step 3. Click Account Settings under Settings and Preferences.
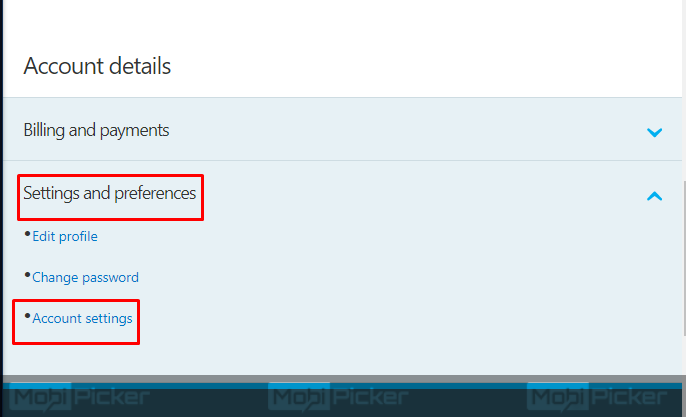
Step 4. Here you will see your Microsoft account with the email address. In front of it, you can find Unlink button. Click “Confirm” when confirmation message appears. It will unlink your Microsoft account from Skype account.

Note: If it says Not Linked then your Microsoft account and Skype account are already not linked.
2. How to Cancel Skype Subscriptions
Now, you have to cancel every Skype subscription and/or recurring payments. Here’s how to do it.
Step 1. Go to your My Account on Skype using a web browser as shown above.
Step 2. Here you will see if you have any subscriptions. Click on them one by one and select Cancel Subscription.
Step 3. Select “Thanks but no thanks, I still want to cancel”. This is a confirmation.
If you use recurring payments, meaning your Skype credit recharges automatically when the remaining balance goes below a certain amount, then you need to cancel it too. To cancel Recurring Payments, follow these steps:
Step 1. Go to My Account, and select Billing & Payment.
Step 2. Click Disable. You will find it under the Auto-Recharge tab.
3. How to Request Skype Refund
If you haven’t used any unexpired Skype subscription, you can ask for its refund. You can do this by following these steps:
Step 1. Go to your Purchase History and select the order you want to get a refund for.
Step 2. Click Refund.
If your account and subscription are eligible for a refund then the refund will be processed in 14 days. This process can also be done by simply doing a live chat with Skype’s Customer Service agents and requesting them for the refund.
4. How to Delete Skype Number
If you don’t have a Skype Number, you can move on to the next point. But, if you have purchased a Skype Number, then you will need to cancel it. This can be done by simply clicking on Skype Number under Manage Features. Now click Settings and select Cancel Skype Number.
5. How to Remove Skype Profile Information
This is to make sure no one can find you or your personal info in Skype directory anymore. To do this, you will have to completely remove or change these to something common:
- Remove your Profile Picture: This is to make sure your image doesn’t get left behind for anyone else to use.
- Update your Mood Status: Change it to something which says you are no longer available on Skype under this account.
- Change your Status: Change your Status to Invisible or Offline.
- Sign out of Skype on all Devices: This can be done by simply going to any chat and typing this chat command: /remotelogout on any device.
- Remove Profile Details: Go to Edit Profile in Settings. Select Edit and click Personal Information. Now, remove every identifiable information of yours. From Contact details to Personal information. Now click Save.
6. Remove your Account
The last step is to remove your Skype account. To do this, follow this link for Skype Account Closure Page. Check out the further steps below.
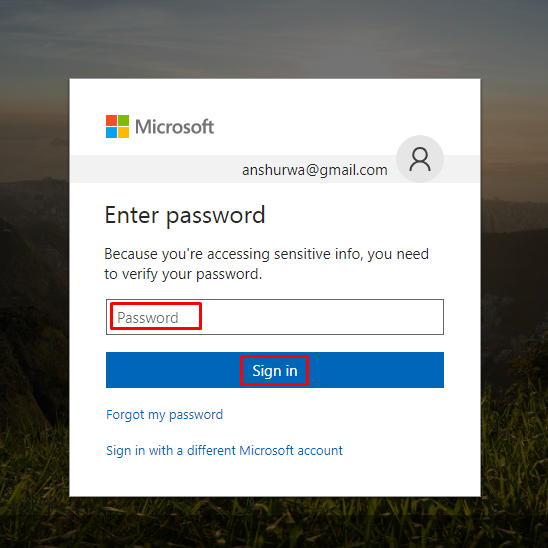
Step 1. Enter your account’s Password. If asked for your account ID, enter it too. Click Sign in.
Step 2. Read everything on the next page and make sure all those steps are done. Now, click Next.
Step 3. Mark every box on this page. Select reason to delete your account at the bottom and click Mark account for closure. This button will not be visible to click if you have left any box unmarked or have not selected a reason.
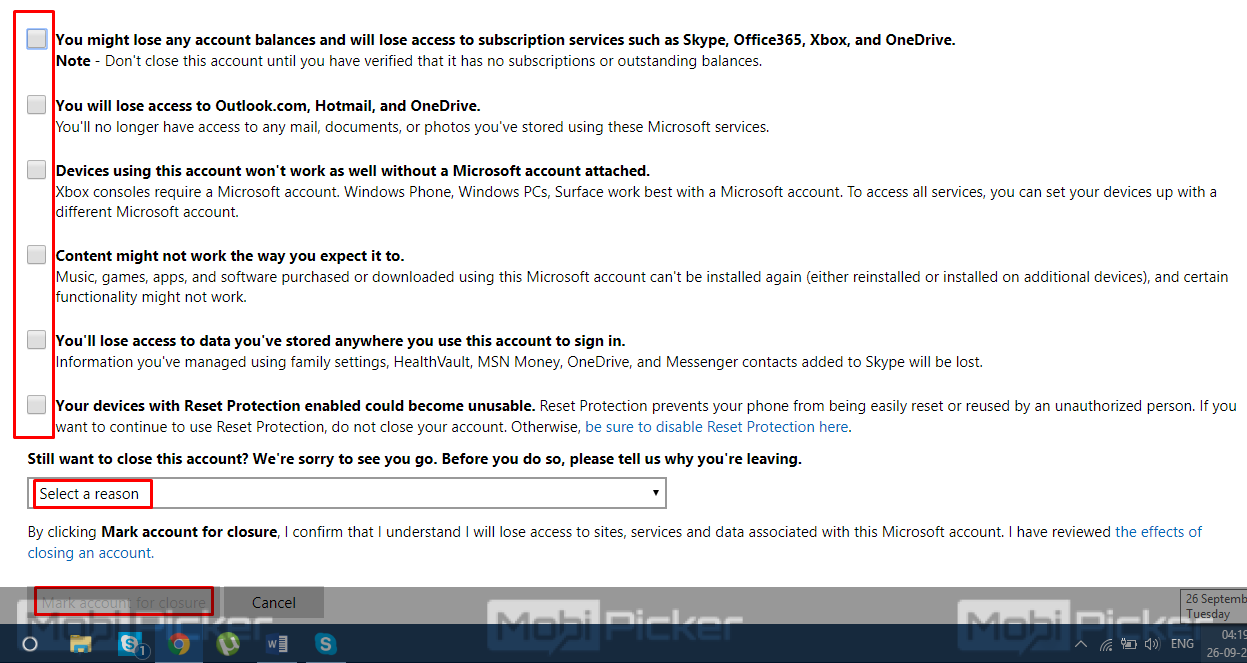
Now, your account has been marked for deletion, and it will be deleted in 60 days.
Conclusion
Skype has been giving us wonderful service of video calls along with many other services. But many people don’t want to use their Skype account anymore. We have received many requests from our users asking how do I delete my Skype account? Well, we hope we were able to help and guide you through the process of deleting your Skype account permanently.
The post How to Delete Skype Account Permanently appeared first on MobiPicker.
(239)


