How to Find and Use Snipping Tool in Windows 10
Are you wondering, how to take screenshots in Windows 10? Microsoft brought a lot of changes with Windows 10. Capturing screenshots is also one of those changes. The earlier used methods are still there, but now it is much easier to take screenshots with Snipping Tool in Windows 10. Many people haven’t even heard the name of this tool. Some aren’t even sure how to find Snipping Tool in Windows 10. Which is why we decided to create this article to help you get familiar with this wonderful tool. In this guide, we will tell you different ways to open Snipping tool and how to use it, along with its other features. But before we begin, let’s have a small introduction to the Snipping Tool in Windows 10.
Everyone once in a while, if not daily, we all have to work with images. Taking screenshots in earlier versions of Windows OS, was a little lengthy process. You had to press the PrtScn, then open Paint and paste the screenshot from the clipboard, then save it. This whole process was time-consuming. Windows XP was by far the most successful Microsoft’s operating system, and to follow this whole process was the only choice on it to take screenshots. This is why and when Microsoft decided to create the Snipping Tool. Windows operating systems after Windows XP, all had the Snipping Tool.
Yes, many of us still haven’t heard about this cool tool, but it has been with us for many more years than we expected. Snipping Tool was introduced in 2005, on Windows XP Tablet PC Edition, and it was then included in Windows Vista and all the Windows OS’ after that. Which means, if you were looking for Snipping Tool download link, there is no need for it. It’s already there. Before you start capturing the screen using Snipping tool in Windows 10, let’s check out how to open it.
How to Open Snipping Tool in Windows 10
You are probably wondering, where is Snipping Tool in Windows 10, right? No, it’s not hidden. It’s actually very easy to find and open it. Check out the steps below.
1. From Cortana
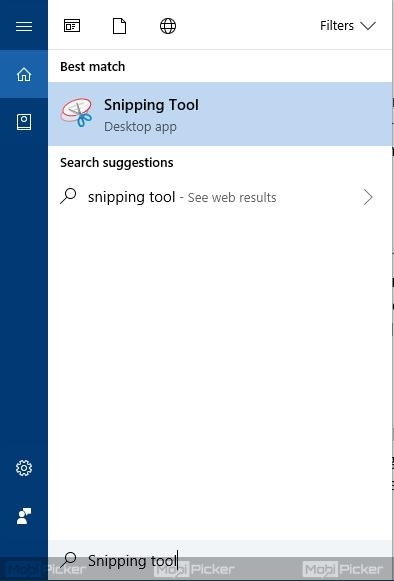
The easiest and quickest way to launch an app in Windows 10 is by searching it through Cortana. Simply go to Cortana on your taskbar and type Snipping Tool and press Enter. The Snipping Tool will open in a second.
2. From Start Menu
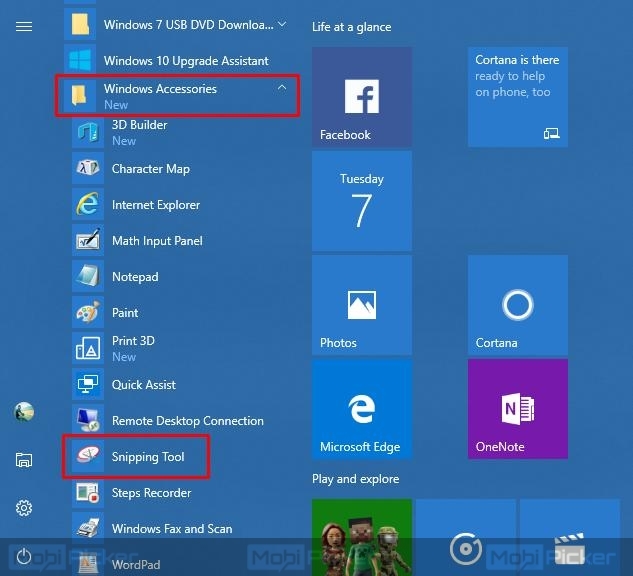
Many people are still getting used to the AI Assistant Cortana, and prefer opening apps the old way, i.e. from the Start Menu. Start Menu features all the apps and their shortcuts. Snipping Tool is too listed there. Just go to the Start Menu and expand Windows Accessories. You will find Sniping Tool here.
3. From Run
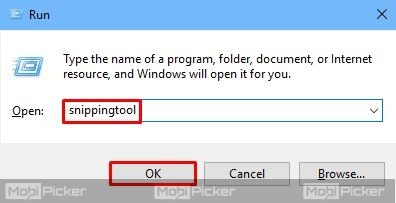
Accessing any app or a program through Run is also a conventional way. Simply open Run from the Start Menu or by pressing together Windows logo key + R. To open Snipping Tool, type “snippingtool” in the Run window and click OK.
4. From Command Prompt
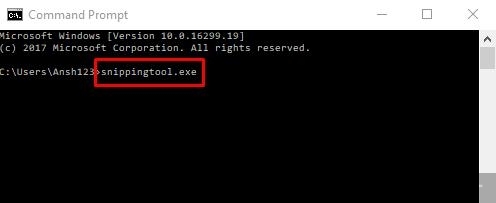
Many times when we are running some commands in the Command Prompt window, we want to take a screenshot of it. Well, the good thing is, you can access the Snipping Tool from the Command Prompt as well. Just type “snippingtool.exe” and press Enter. This method is also useful when you are in the Recovery mode and want to take screenshots there. Command Prompt is available in the Recovery screen, meaning, you can open Snipping Tool there as well.
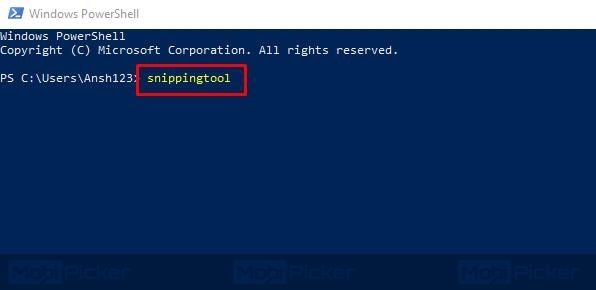
5. From Windows PowerShell
Snipping Tool can be opened from Windows PowerShell as well. Simply type “snippingtool” and press Enter.
6. From Explorer
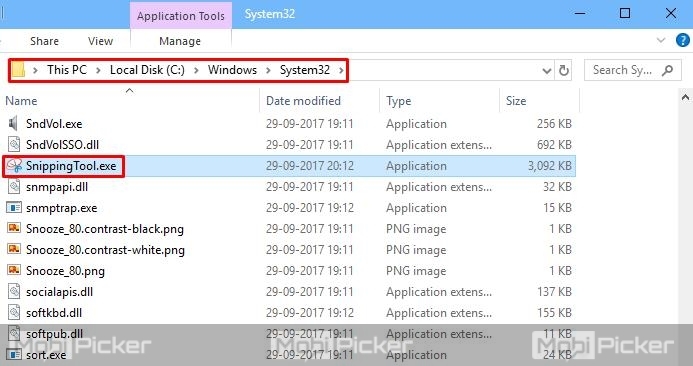
Just like every other program, Snipping Tool can also be opened from its location. Open your Windows Explorer window and follow this path –
Local Disk (C:) > Windows > System 32
Now look for Snipping Tool, and open it. If you want to create a Shortcut, you can do it from here. Simply right-click on Snipping Tool and select Create Shortcut. Using this, Windows 10 Snipping Tool shortcut will be created on your Desktop.
So, these were the ways to open the Snipping Tool in Windows 10. Now let’s learn how to use it.
Windows 10 Snipping Tool Features
If you had used the Snipping Tool in the earlier versions of Windows Operating System, you will find it on Windows 10 with a slight change. Now, there is a Mode and a Delay buttons included in it. What do these buttons do? Let’s find out about it, along with every other feature of the Snipping Tool in Windows 10.
When you open Snipping Tool, you will see 5 buttons on it. Let’s learn about these buttons and what they do.
1. New
The New button refers to taking a new screenshot. Clicking on it lets you select the screen area you want to capture.

2. Mode
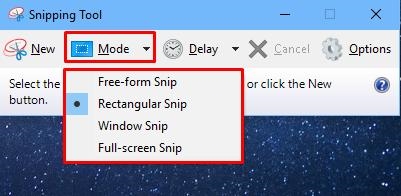
The Mode button refers to different modes of taking a screenshot using this tool. When you click on it, you will see 4 options to select from. Here’s what they mean –
- Free Form Snip: Using the Free Form Snip mode, you can take the screenshot in any form. Clicking it will immediately let you select the area you want to capture.
- Rectangular Snip: As the name suggests, you can select the area of your screen in rectangular form. Clicking on it allows you to select the area to capture.
- Window Snip: The Window Snip mode button lets you take a screenshot of any one window. Suppose you have more than two windows open side by side, and you want to take the screenshot of just one particular window. Click on the Window Snip mode button and the Snipping Tool will then let you select the window you want to capture.
- Full-screen Snip: The Full-screen Snip mode is there to take the screenshot of your complete screen. Clicking on it straight away takes the screenshot of your screen and opens it up in the Snipping Tool itself.
3. Delay
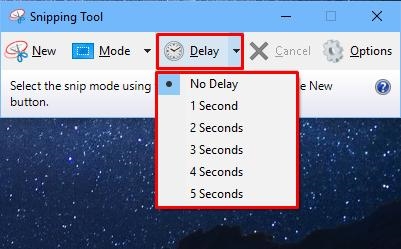
The delay button is another new feature added to Snipping Tool in Windows 10. Clicking on this button opens up 6 options to select from. No Delay is selected by default. Now, to understand the purpose of this feature better, let’s suppose you select “3 Seconds”. After selecting it, as usual, to take a screenshot you either click New or select any option from Mode. Now, when you click New or an option from Mode, the tool will let you select the area to capture after a delay of 3 Seconds. This feature can be useful when you want to take a screenshot with right click options of some program, etc. Delay gives you time to perform an action and reach the situation you want to capture.
4. Cancel
The Cancel button is to cancel the screenshot process when the tool lets you select the area to capture. Clicking on it cancels the process and takes you back to the mains screen of Snipping Tool.
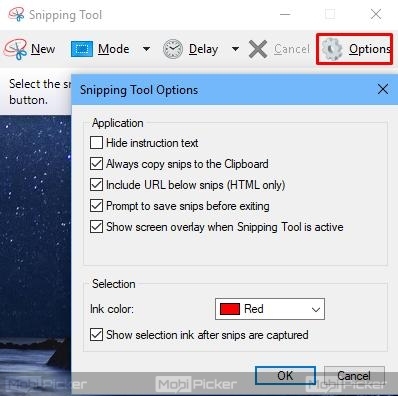
5. Options
Clicking on the Options button opens up a small dialog box with different preferences to select and unselect. You can also change the ink color which is used to show the marked area while selecting an area to capture.
How to Take Screenshots Using Snipping Tool in Windows 10
Taking screenshots with Snipping Tool is very easy. Now, we will tell you how to take a screenshot with Snipping Tool, step by step.
Step 1. Click on New for Rectangle Snip mode (Default). You can also select any snip mode from Mode.

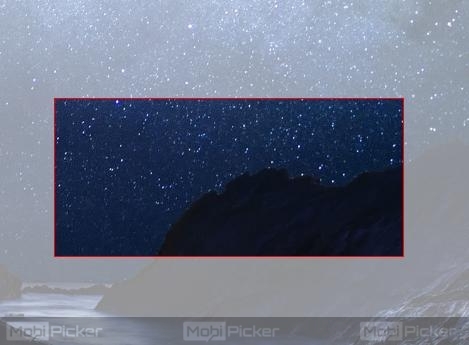
Step 2. Now, select the area using your mouse. In case of Window Snip, select the window. This step will be skipped if you selected Full-screen Snip mode.
Step 3. After you have selected the area, the Snipping Tool will show you the captured screenshot.
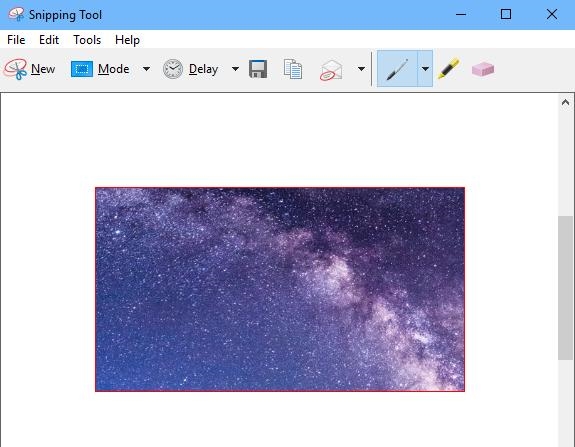
Step 4. If you are not satisfied with it and want to take the screenshot again, simply click on New. You can also edit your screenshot from here. To save the screenshot, go to File and select Save. The screenshot will be saved in your Pictures library, under Screenshots folder.
Taking screenshots with Snipping Tool in Windows 10 is very easy. Hopefully, we were able to help you understand this tool. If you have any queries about it, please mention in comments below.
The post How to Find and Use Snipping Tool in Windows 10 appeared first on MobiPicker.
(268)


