How to Fix DNS_PROBE_FINISHED_BAD_CONFIG in Chrome
A lot of users are facing DNS_PROBE_FINISHED_BAD_CONFIG error on Chrome these days. As the name suggests, the problem is related to DNS and quite similar to DNS_PROBE_FINISHED_NXDOMAIN that prevents you from browsing the Internet as usual. Though the problem can occur on any OS including Windows 7, Windows 8, Vista, XP, and Mac OS; the more and more Windows 10 users are reporting the error these days. Keep reading to get better knowledge about DNS, DNS PROBE FINISHED BAD CONFIG issue, and how to fix it on Windows PC as well as a Mac.
Contents
- 1 What is DNS?
- 2 What is DNS_PROBE_FINISHED_BAD_CONFIG?
- 3 How to Fix on DNS_PROBE_FINISHED_BAD_CONFIG on Android
What is DNS?
DNS stands for Domain Name System. It is the service that translates domain names into IP addresses. Each network has its DNS system, and if it is unable to translate a domain name into an IP, it will ask another DNS systems, until it returns correct IP.
What is DNS_PROBE_FINISHED_BAD_CONFIG?
If DNS server is unable to return correct IP for the domain name, it will most likely return DNS_PROBE_FINISHED_BAD_CONFIG error code. There are lots of reasons for getting this error, and there are several ways to fix it. This error could occur because of the internet provider (ISP), router, computer, or website, so we recommend doing steps until we fix this problem.
How to Fix on DNS_PROBE_FINISHED_BAD_CONFIG on Android
If you are seeing DNS_PROBE_FINISHED_BAD_CONFIG chrome error on Android, here are the possible fixes. Follow the solutions in the same order as mentioned below.
Solution 1: Restart Router
It is possible that the issue is with your router. When you restart the router, it returns all default configurations. If there is any issue that was not there by default, it could be removed by restarting. This is a common solution for all the devices including Android, Windows 10, or Mac. It doesn’t matter which device you are using, restarting router could fix DNS_PROBE_FINISHED_BAD_CONFIG on Android smartphones as well as PC.
Solution 2: Flush DNS Cache on Android
Next solution I will suggest flushing DNS in order to fix DNS_PROBE_FINISHED_BAD_CONFIG on Android.
You can flush DNS by hard reset. Simply take out the battery of your Android device, wait 30 seconds and put it back. Power on your smartphone and see if the problem still exists.
These days we have many high-end smartphones which comes with non-removable battery. For such smartphones, follow the below steps to flush DNS cache.
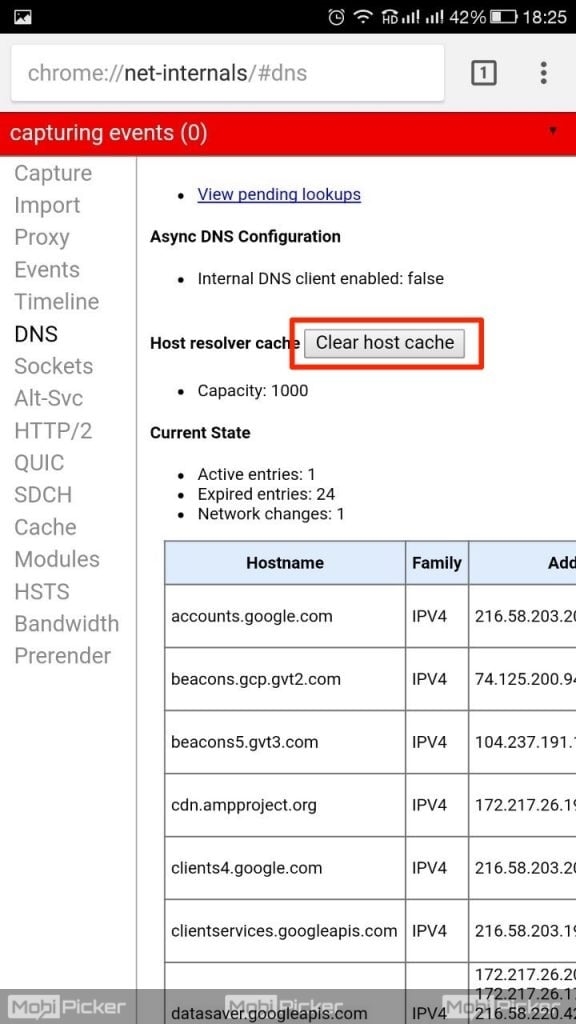
Step 1: Go to chrome. Type chrome://net-internals/#DNS in address bar. Tap on “Clear Host Cache”
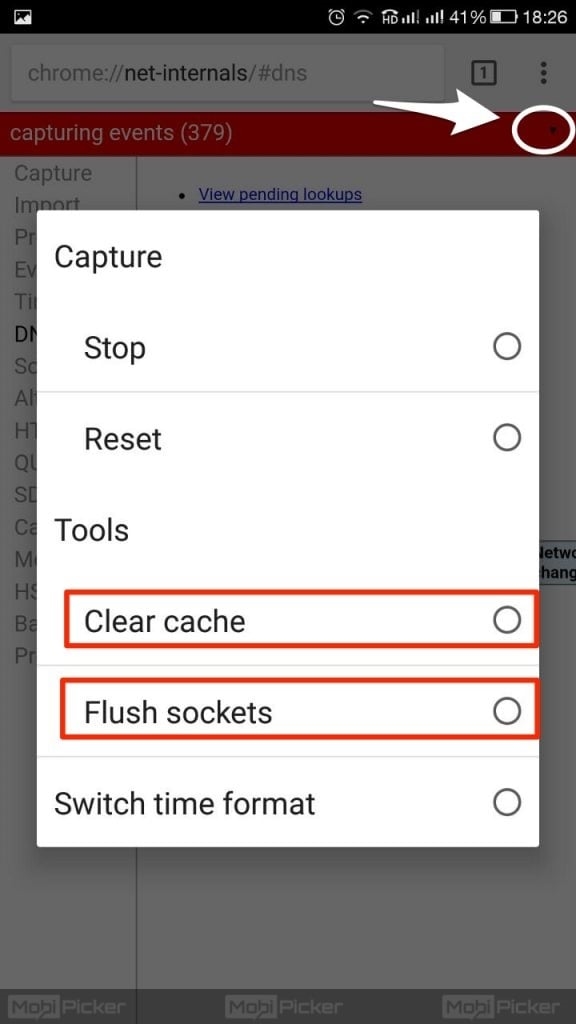
Step 2: Click the black arrow as shown in the image below. Select “Clear Cache” and “Flush Sockets” from the options. Now restart the Chrome.
After flushing the DNS cache, check if it fixes DNS_PROBE_FINISHED_BAD_CONFIG on Android. If you can still see the error, try out next solution.
Solution 3: Renew IP Address on Android
Renewing IP address on Android can fix the DNS probe finished bad config. However, it is not as easy as Windows PC and Mac. So instead of going in depth technical documentation, I will suggest you install ipconfig app available on Google Play. The app will do the job for you.
How to Fix on DNS_PROBE_FINISHED_BAD_CONFIG on Windows 10
If you are a Windows user, the below solutions can fix the problem for once and all. Try one by one until the error is fixed. Please note that these solutions will work on all the Windows versions including Windows 10, 8, 7, Vista, and XP. However, we are performing the steps using a Windows 10 PC. There could be a slight difference in particular settings name; rest will be same for all the versions.
Tip: If you still using an older version of Windows, download Windows 10 ISO file here.
Before we start with the actual solutions, it is necessary to understand where the problem is. If you succeed to access the website from another device on the same network, the problem is most likely in your computer. If this is the case, go directly to solution two. If you cannot access the site from any device on the same network, proceed with solution one.
Similar error: NET::ERR_CERT_AUTHORITY_INVALID
Solution 1: Restart Router
As mentioned above in the Android solutions, restarting router is a common solutions for all the devices including Windows 10 PC. So, start with this easy solution, and if it didn’t work, we could go with advanced settings to fix the DNS PROBE FINISHED BAD CONFIG on your Windows 10 PC.
Solution 2: Disable Firewall and Anti-virus on Windows 10
It could be possible that you are having issues with Firewall, or an antivirus, so we advise you disable them. It can fix the error in minor cases. If it is still there, turn them back on, and keep on following other solutions. Below are the steps on how to turn off Windows firewall.
1. Press Start and type “Firewall” in the search box.
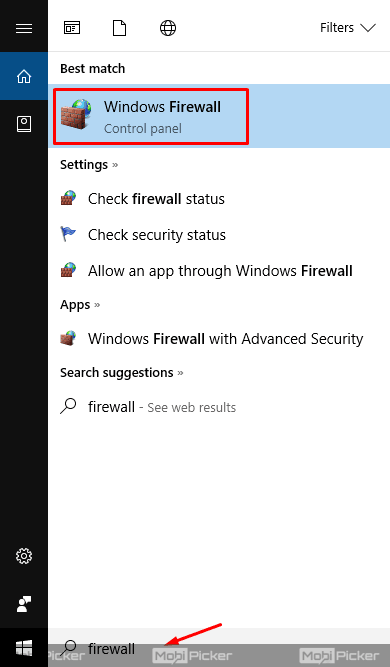
2. Once the Windows firewall option appears, open it, and click on “Turn Windows Firewall on or off.”
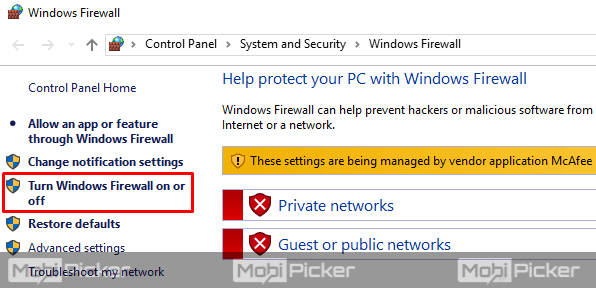
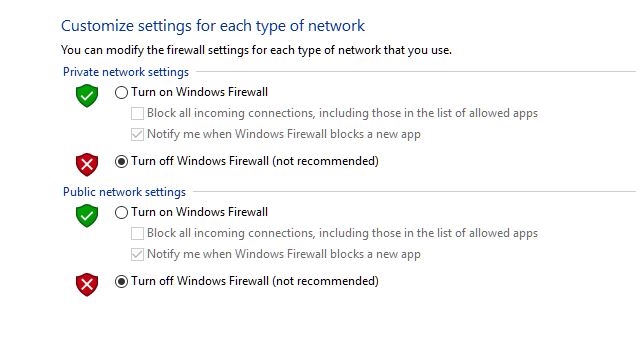
3. After that, click on both “Turn off Windows Firewall” for both private and public networks. Then click “OK,” and Firewall is disabled.
Pro Tip: Do you know you can start using Windows 10 Multiple Desktops in a few seconds?
Solution 3: Clean DNS with Command Prompt (CMD)
If the error did not fix in above solutions, try cleaning DNS using Command Prompt. In most of the cases, this solution fixes the DNS_PROBE_FINISHED_BAD_CONFIG error in Chrome. Follow the steps below.
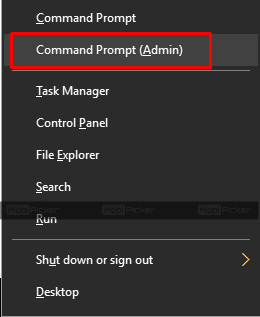
1. Press Start and type “cmd.” When Command Prompt appears, click on “Command Prompt (Admin)” on Windows 10 PC. If you are using Windows 7, 8 or others, right-click on “Command Prompt” option and select “Run as administrator.”
2. In the Command Prompt, paste the “ipconfig/release” command and press Enter.
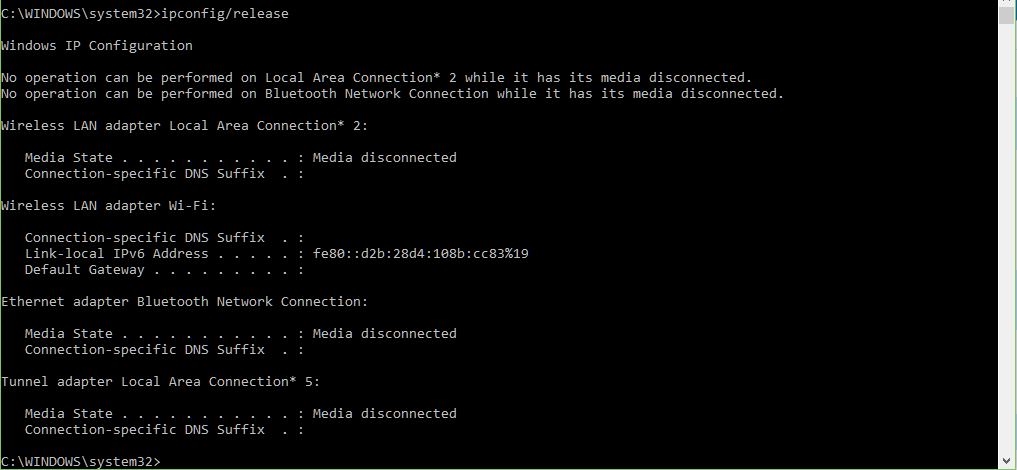
3. Once the above command is completed, now enter “ipconfig/flushdns“. Hit the enter and wait for the command to execute and complete the process.

4. Now in the next step, run “ipconfig/renew” command same as above commands.
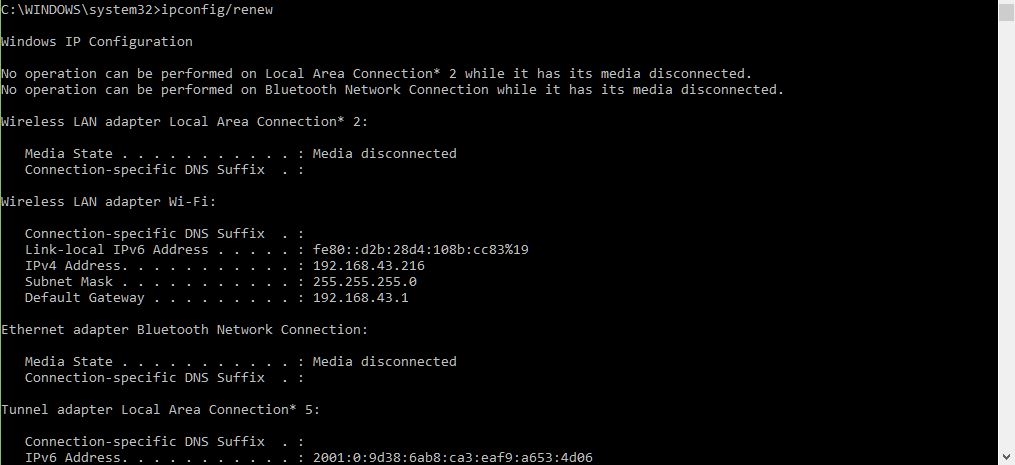
These commands will erase your current DNS and “reset” it.
Solution 4: Change DNS Address in Windows 10
If you are still facing DNS_PROBE_FINISHED_BAD_CONFIG error on Windows 10, 8, 7 or XP, try changing DNS address in the Control panel. To do that, follow the below instructions.
Pro tip: Do you know it is possible to use iMessage on Windows?
1. Open Control panel by pressing Start, and writing “Control panel.”
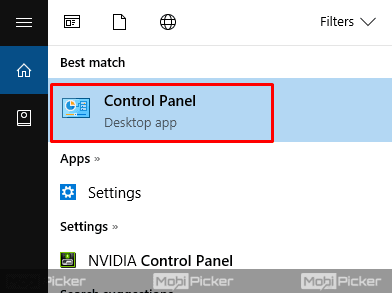
2. Search for “Network and sharing center” in Control Panel and open it. Now click on “Change adapter settings.”
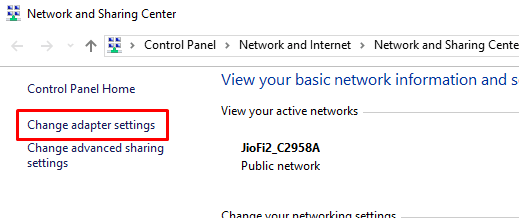
3. On the Adapter settings page, right-click on the adapter which you are using for the Internet connection and select “Properties.” It should usually be named as your Wi-Fi network name or “Local area connection,” but it is not the case on every device.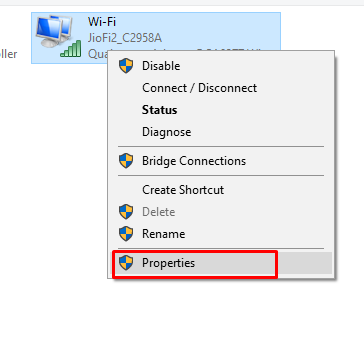
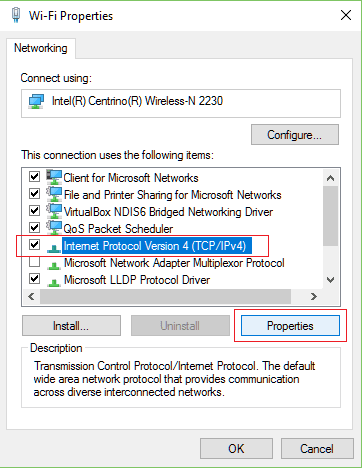
4. In the properties, you should see a new window opened with adapter settings. Select your “Internet Protocol Version 4 (TCP/IP)” property, and click on “Properties“. Check picture below for any doubts.
5. Now an another window should open, click on “Use the following DNS addresses”. Under “Preferred DNS address” enter “8.8.8.8”, and under “Alternate DNS server” enter 8.8.4.4. Press “OK,” and check on the browser if that fixed your issue.
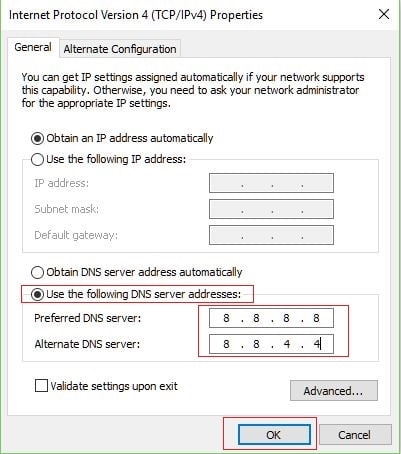
If it is not fixed, try switching to Preferred DNS server: 205.67.222.222 and Alternate DNS server: 205.67.220.220. If this also didn’t fix the DNS probe finished bad config error, proceed to next solution.
Solution 5: Reset TCP/IP on Windows 10
It is possible to reset TCP/IP automatically and manually. We do not recommend doing it manually, especially if you don’t know what are you doing, so we advise you go to this link, and follow Microsoft’s instructions that will automatically reset it.
Related Fix: ERR_QUIC_PROTOCOL_ERROR
Solution 6: Reinstall Network Drivers on Windows 10
In most of the cases, the above-given solutions fix the DNS probe finished bad config problem. If your case is different and the problem is still persistent, you should try to reinstall network adapter drivers. If you are using outdated and incompatible Network drivers, you can very well face the DNS_PROBE_FINISHED_BAD_CONFIG in your internet browser or Chrome.
Follow the below steps to check if there is an update available for network drivers.
1. Go to Device Manager. You can search “Device Manager” in the search box and open it.
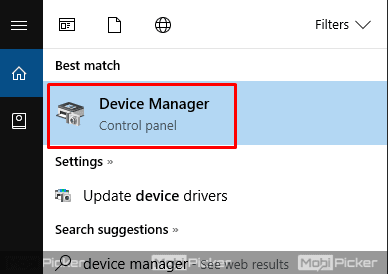
2. Locate “Network adapters” in the listed options, and expand the “Network adapters” listing.
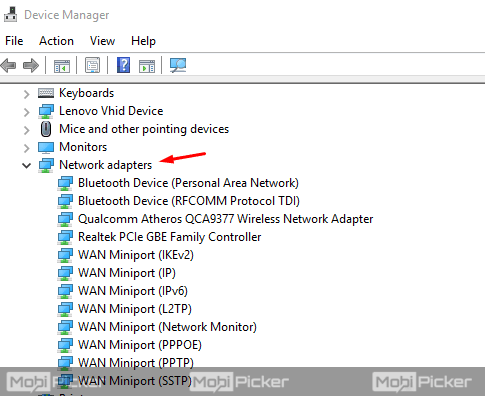
3. Right click on adapters and click on “Update Drivers.” It will take you to a new window. Here select the “Search automatically for updated driver software.” If Windows find the new drivers, you can update them.
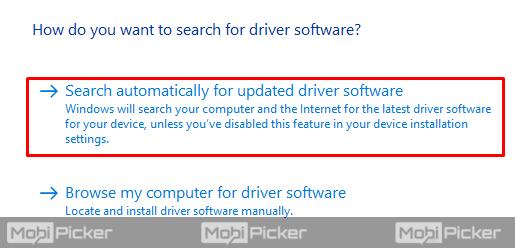
The solutions mentioned above should fix the DNS PROBE FINISHED BAD CONFIG for Chrome in Windows PC.
How to Fix DNS_PROBE_FINISHED_BAD_CONFIG on Mac
Similar to Windows PC users, Mac users also see DNS_PROBE_FINISHED_BAD_CONFIG as the problem is primarily related to DNS. Check out the step-by-step guide below to fix the error on MacBook or iMac.
Solution 1: Renew IP address on Mac
To renew IP address on MacBook, please see the steps below.
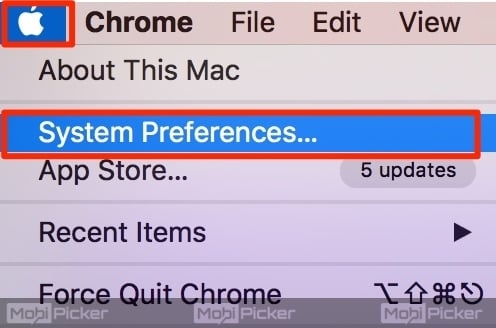
1. Click on Apple logo in the top left corner, and select System Preferences.
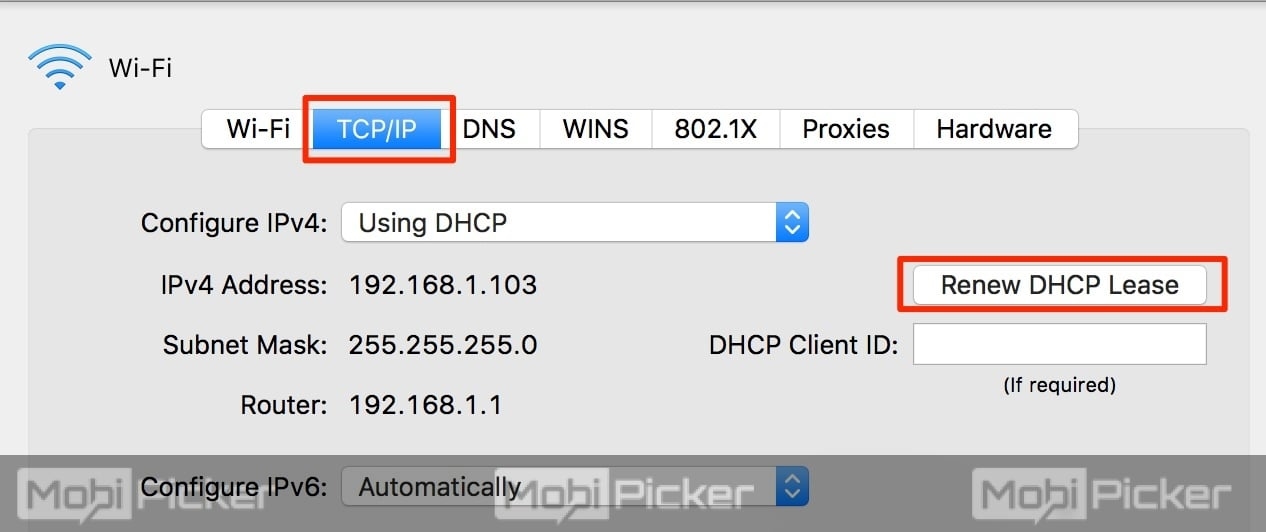
2. Open Network from System preferences window. Now choose the network you are connected to, and click on Advanced button.
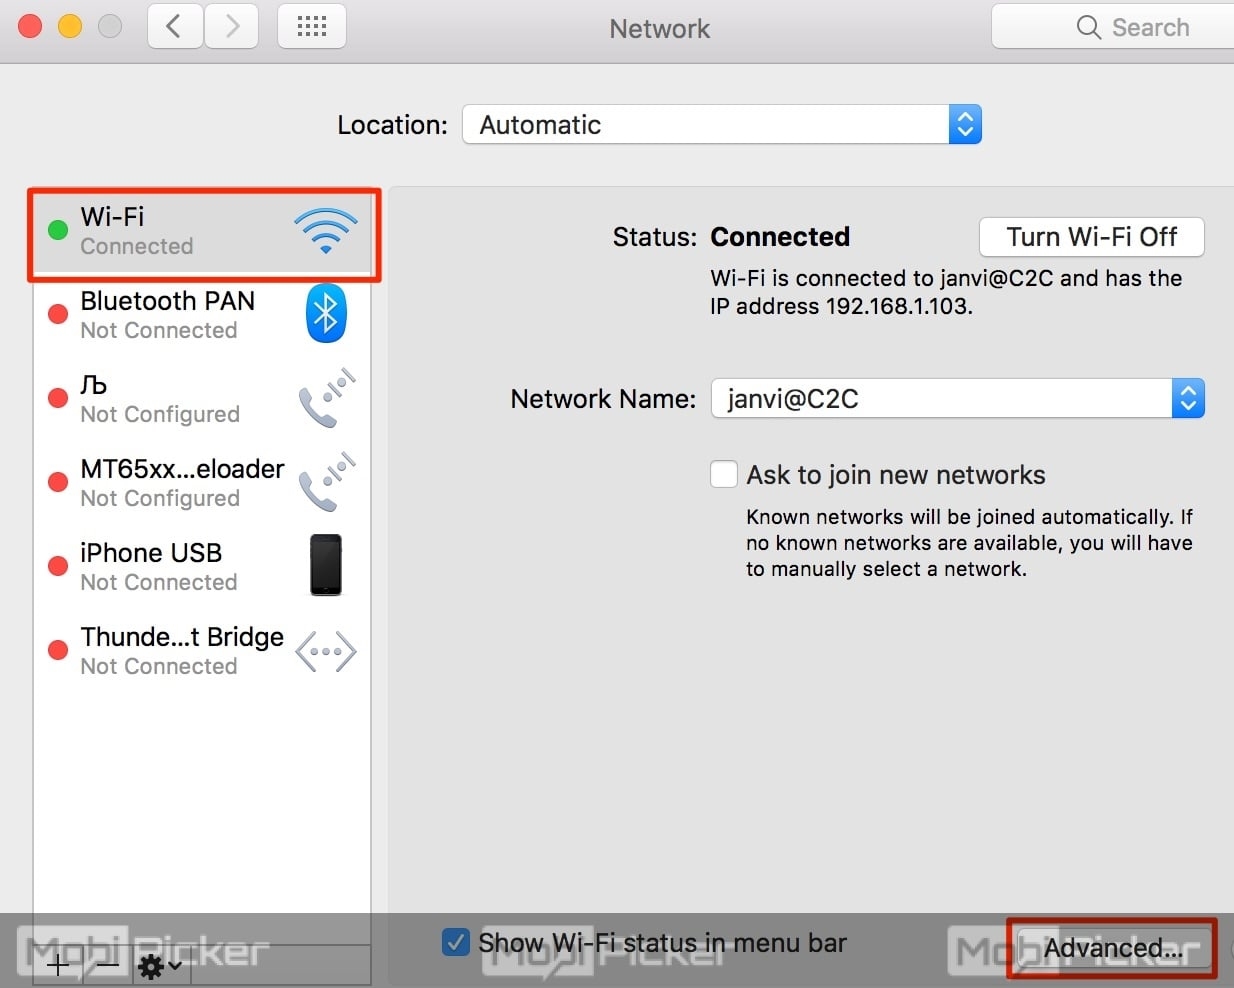
3. Select TCP/IP. After that, click on Renew DHCS Lease, and that will renew your IP address.
Solution 2: Flush DNS on Mac
To flush DNS on Mac, go to Terminal. To open the terminal, you can simply search “Terminal” in the search bar. Alternatively, you can find it on the path “Finder/Applications/Utilities/Terminal.”
When you opened your Terminal, you need to enter one of following lines, depending on your version of operating system.
OS X 10.4 (Tiger): “lookupd -flushcache“.
OS X 10.5 (Leopard) and 10.6 (Snow Leopard): “dscacheutil -flushcache“.
OS X 10.7 (Lion) and 10.8 (Mountain Lion): “sudo killall -HUP mDNSResponder“.
OS X 10.9 (Mavericks): “dscacheutil -flushcache; sudo killall -HUP mDNSResponder“.
OS X 10.10.1, 10.10.2, and 10.10.3: “sudo discoveryutil udnsflushcaches“.
OS X 10.10.4+: “sudo dscacheutil -flushcache;sudo killall -HUP mDNSResponder“.
OS X 11 (El Capitan) and OS X 12 (Sierra): “sudo killall -HUP mDNSResponder“.

Solution 3: Change DNS Address on Mac
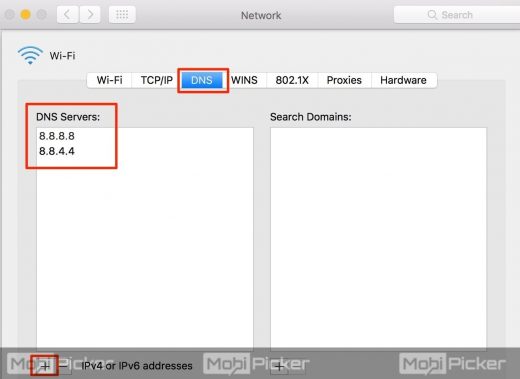
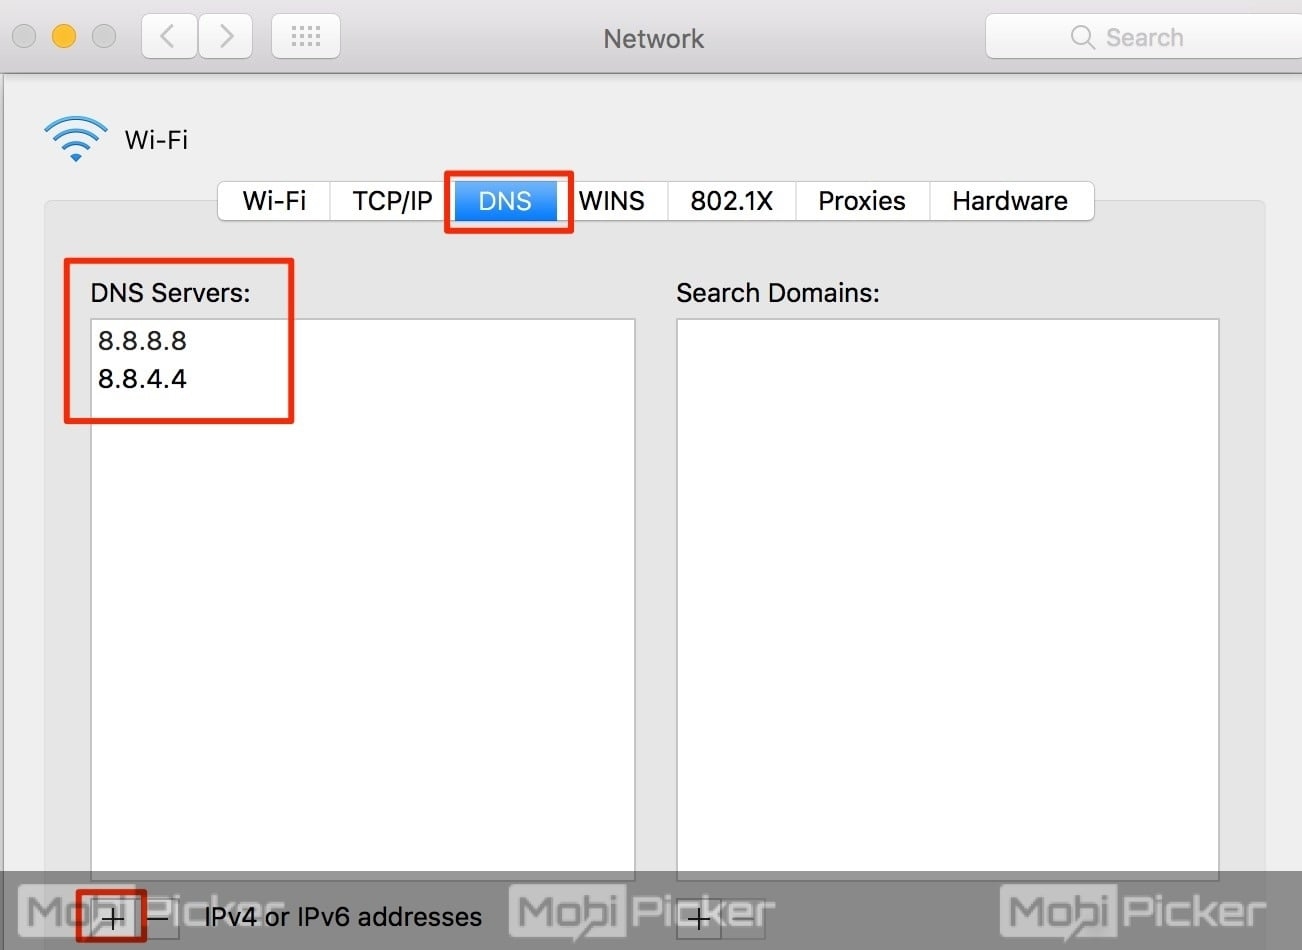
For changing DNS on Mac, follow the first two steps as mentioned in the Solution 1 above. Now instead of TCP/IP which we selected in the first solution, choose the DNS tab. Click “+” and add the 8.8.8.8 and 8.8.4.4 DNS addresses. After that, click “OK.”
Let us know your experience with our guide. Were you able to fix DNS_PROBE_FINISHED_BAD_CONFIG Chrome error on Windows 10 or Android or Mac? If the error still exists, comment below with details, and we will help you.
The post How to Fix DNS_PROBE_FINISHED_BAD_CONFIG in Chrome appeared first on MobiPicker.
(166)

