How to Fix WMI Provider Host (WmiPrvSE.exe) High CPU in Windows 10
Troubled with high CPU usage in Windows 10? If WMI Provider Host is behind the high CPU usage on your PC, you are not alone who is facing this problem. Many users are reporting a spike in their CPU usage on Windows 10 due to WMI Provider Host. In this guide, we will help you fix this issue using different methods. But before we begin, let’s have a little introduction.
Windows 7 was good, but Microsoft has changed a lot in Windows 10. Even the whole UI has changed, which was not much touched by Microsoft in their previous OS before Win 8. The change in UI brought a lot of attention towards Windows 8. When the same was carried on to Windows 10 with a few changes, people loved it. Many Windows users, who earlier didn’t upgrade to Windows 8, started upgrading to Windows 10. But, when they started getting used to it, they noticed Windows 10 was full of bugs. These weren’t actually bugs, but System processes, which were doing their job but also causing different issues. Processes like CompatTelRunner.exe and WmiPrvSE.exe were amongst the few which caught attention quickly. These both processes were eating up the high memory in Windows 10 Task Manager, and apparently, leading to slowing down of the PCs.
WMI Provider Host or WmiPrvSE.exe has been eating up your CPU memory since you upgraded to Windows 10. Well, it has been on your computer when you were on earlier Windows OS’. Yes, it was on Windows XP, Windows Vista and Windows 7. But it never bothered much before upgrading to Windows 10.
Contents
- 1 What is WMI Provider Host?
- 2 How to Disable WMI Provider Host
- 3 How to Fix WmiPrvSE.exe High CPU Usage in Windows 10
What is WMI Provider Host?
The process WmiPrvSE.exe or WMI Host Provider is Windows Management Instrumentation Provider Service. It is a part of Microsoft’s WBEM (Web Based Enterprise Management) system and CIM (Common Information Model). In layman terms, this is a very important process. It is a host that allows all the necessary management services to operate and it will be very difficult to manage an application without it. So, it is not a virus if you were thinking otherwise. But the questions is, why is it eating up the high CPU memory? Well, the process had a problem after the release of Windows 10, and it affected the operating server with excess CPU utilization. But the problem is, many viruses copy this file’s name and hide in plain sight. This is why it is important to keep your antivirus’ definitions update.
How to Disable WMI Provider Host
After going through the frustrating experience, one might ask how to disable WMI Provider Host. Well, you can’t, and you shouldn’t. It is a an important process and all the applications need it to run. If this process stops then a lot of features on your computer will become completely useless. Your computer will also stop sending you notifications. So disabling this process is a big NO. If you are having issues with this process, then we can fix it. But disabling is not an option.
How to Fix WmiPrvSE.exe High CPU Usage in Windows 10
The issue can be fixed using three methods. All these methods work, but you may have to try all of them. So, start with the first and work your way down to the last. Remember to perform every step carefully.
1. Run a Virus Scan
As I mentioned earlier, many viruses use this file’s name. So the first step is to make sure that the file with high CPU usage is not an infected file. Open your antivirus or Windows Defender and perform a scan. If the scan catches any unwanted applications or programs, remove them from your Windows 10 system straight away. If the scan shows clean results, then move on to the next method.
2. Troubleshoot in Safe Mode with Networking
Fixing this issue in Safe Mode is a better idea. This will help you identify and isolate the problem maker. Follow these steps to start Windows 10 in Safe Mode and fix the issue:
Fix Also: System and Compressed Memory High Disk Usage in Windows 10
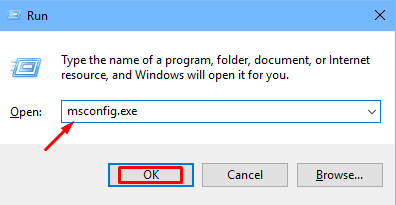
STEP 1. Press Win key logo + R to open Run program. Enter msconfig.exe and click OK.
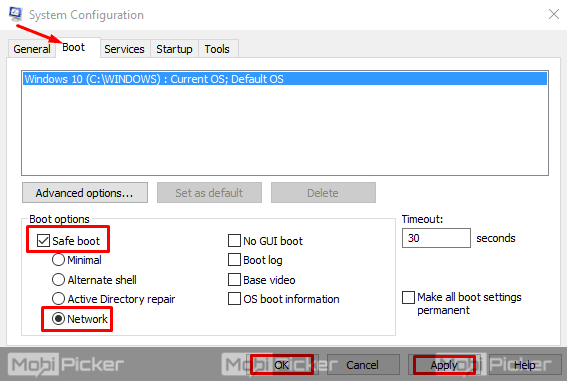
STEP 2. System Configuration will open up. Now, go to Boot tab and tick mark Safe Boot. Also select Network below it. Click Apply and then OK.
STEP 3. Your computer will ask you to restart your system now or later, as shown below. If you don’t have any unsaved file open, then click Restart. If there are, then click Exit without restart. Save your work and restart your system.

STEP 4. After restarting Windows 10 in Safe mode with Networking, right click on your Start menu button. Select Windows PowerShell (Admin).
STEP 5. This will open a Windows PowerShell window. Type in the command mentioned below and press Enter.
msdt.exe -id MaintenanceDiagnostic
This will open a troubleshooting window. Click Next. If any problem is detected by the troubleshooter, follow the instructions to get it fixed. When you are done, move to next step.
STEP 6. Now, you need to type another command and press Enter.
msdt.exe /id PerformanceDiagnostic
This will also open a troubleshooting window. Repeat the process which you performed in the last step.
STEP 7. After you are finished with the last step, close the Administrator: Windows PowerShell. Press Win key logo + R to open Run program. Enter msconfig.exe and click OK.

STEP 8. System Configuration will open up. Now, go to Boot tab and unmark Safe Boot. Click Apply and then OK.
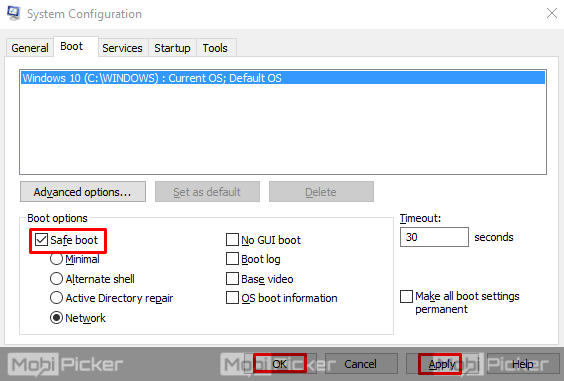
Restart your computer and check if the issue is solved or not. If the problem still persists, try the next method.
3. Restart WmiPrvSE.exe (WMI Provider Host Service)
The last possible reason of excess memory usage is if this file is occupying too much system resources. We can fix the WMI Provider Host high CPU usage by restarting this service. Follow the below steps:
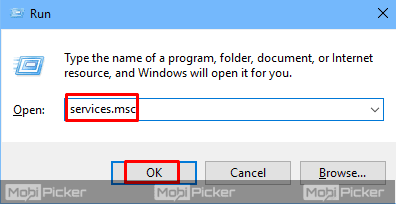
STEP 1. Press Win key logo + R. Type services.msc and click OK.
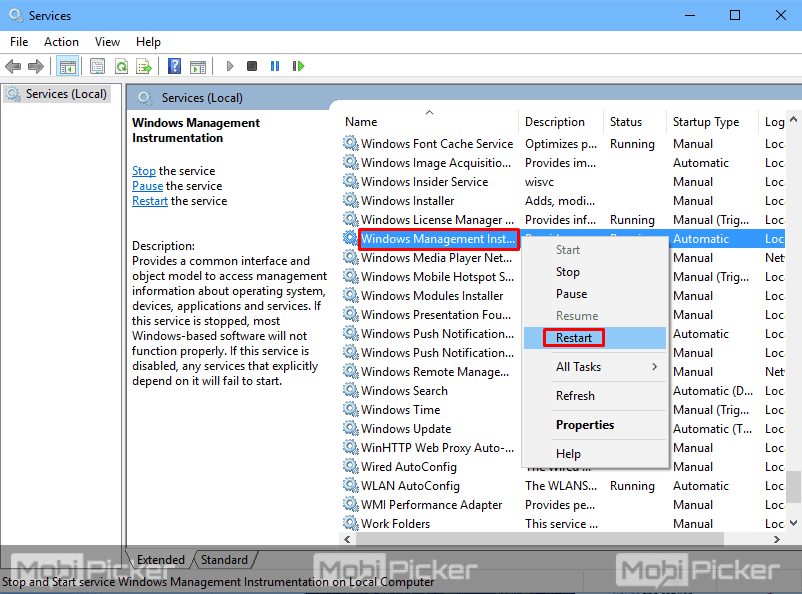
STEP 2. Find Windows Management Instrumentation. You can locate it quickly by pressing W on your keyboard. Right-click on Windows Management Instrumentation and select Restart.
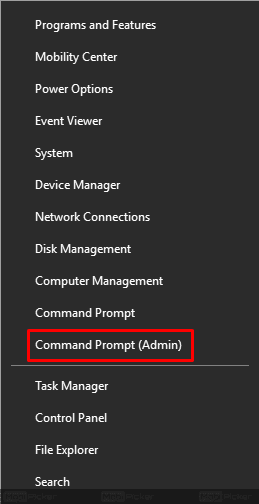
STEP 3. Now you have to open Command Prompt (Admin). To do so, right-click on the Start button and select Command Prompt (Admin).
STEP 4. As the command prompt window will open, type the below mentioned commands one-by-one and press Enter after each command.
net stop iphlpsvc
net stop wscsvc
net stop Winmgmt
net start Winmgmt
net start wscsvc
net start iphlpsvc 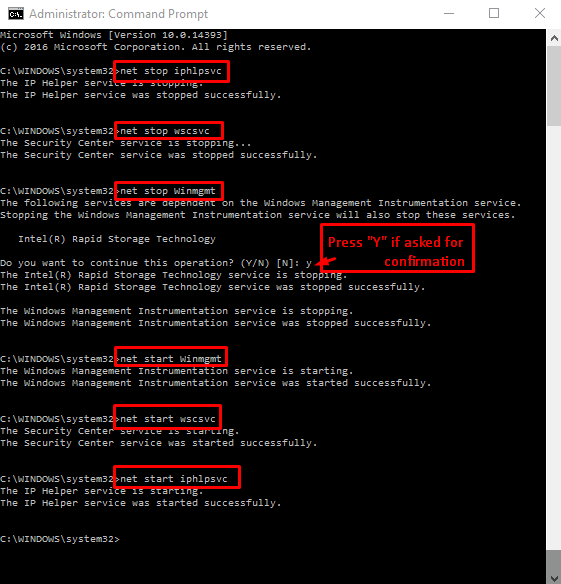
After entering the commands, restart your computer. This will restart the process WmiPrvSE.exe and it should fix high CPU usage problem.
Conclusion
Nowadays, everything is about speed. We want fast smartphones and fast computers which can work without any lag. But even after spending a lot of money on your device, if something interrupts and slows down its processing speed, then you will surely feel cheated. WMI Provider Host is one such process which could be slowing down your computer. Hopefully, we were able to help you fix WMI Provider Host high CPU in Windows 10. If you are still facing a problem with the WmiPrvSE.exe process, let us know in the comments below.
Fix Also: Service Host Local System High Disk Usage in Windows 10
The post How to Fix WMI Provider Host (WmiPrvSE.exe) High CPU in Windows 10 appeared first on MobiPicker.
(74)

