How to Turn Windows 10 PC into Wi-Fi Hotspot
Although Windows 10 is loaded with numerous distinct features and Microsoft is still developing it, still, there are no features that could turn Windows 10 into a Wi-Fi hotspot. Smartphone users normally use the internet on their phones but what if you could use the data from your PC to run the internet on your mobile.
Wouldn’t it be fun if you could share your wired connection with all your devices? Looks like with Window 10 and a free application you can have a Wi-Fi hotspot. This could be beneficial if you are limited to one device per head on the Wi-Fi network or maybe you have just one password. There are two ways that we have listed for you. You can use either of them to transform your Windows 10 PC or laptop to a Wi-Fi.
Method 1 to Turn Windows 10 PC into Wi-Fi Hotspot
This is a more technical way to use your Windows 10 to make it a Wi-Fi hotspot and you do not have to download any types of third party apps or software. You just need to follow the steps listed below:

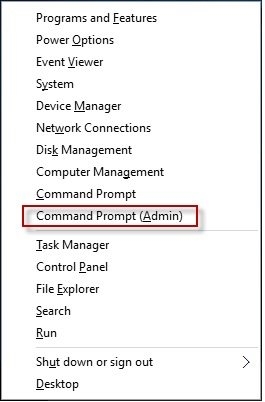
- First, press Win+X and open the power user settings menu, now select “Command Prompt”.
Source -www.isumsoft.com - Enter the command below and replace the values for SSID and key with the network name and password that you want:netsh wlan set hostednetwork mode=allow ssid=AdHoc key=password
- Now run the command to start the network:netsh wlan start hostednetwork
- In the Start menu search for “View network connections.”
- Right-click on your main Ethernet connection and select “Properties.”
- In the “Sharing” tab, select the box labelled and “Allow other network users to connect through this computer’s internet connection.”
- Finally, in the drop down below the above box, select the network connection that currently has access to the internet and Click “OK”.
You now have a new Wi-Fi network connected to your home internet. The Wi-Fi hotspot will work only if the Windows 10 is working, make sure the Windows 10 device is active till you want the hotspot to work.
Method 2 to Turn Windows 10 PC into Wi-Fi Hotspot
This method requires you to download a free app called Virtual Router.
- Go to virtual routers homepage, download and install the app.
- You need to configure your network, fill in the name of the network and your choice of password. From the drop-down select the connection that you want to share. Choices may be different depending on which connection you are connected; it can either be Ethernet or a Wi-Fi device. Now select “Start Virtual Router”.
- If you face any problems after the above steps, make sure to check if you have enabled your sharing preferences.
- In the Start menu Search for “View Network Connections”, look for the connection you wish to share i.e Ethernet or Wi-Fi. Now right click on the device and select “Properties”.
- Have a look at the “Sharing” in the “Properties” and make sure “Allow other network users to connect through this computer’s Internet connection” has been checked.
That should fix any problems you seem to encounter.
- Once your configuration is complete, the network name will be visible you can now select your Wi-Fi hotspot, enter your password and get connected.
- When you have completed sharing your Internet or you wish to move to another location make sure you stop the app. Simply click “Stop Virtual Router.”
With Windows 10 emerging as one of the most used Windows, users continuously demand more features and newer ways of utilizing the latest Microsoft Operating System. Turning Windows 10 into Wi-Fi is one of the best things about Windows 10. With these steps you will be able to do it effortlessly and if you were to encounter any problems we’ve got your back with the fixes too.
The post How to Turn Windows 10 PC into Wi-Fi Hotspot appeared first on MobiPicker.
(42)

