These 7 tips will make you a Chromebook power user
Part of the appeal of handy-dandy Chromebooks is that they’re so easy to use. Boot one up, sign in to your Google account, and . . . well, that’s about it.
But if you use a Chromebook regularly, there are a handful of pretty cool and useful features you might not have discovered yet. Let’s take a look at some tips and tricks that make life with a Chromebook more rewarding.
Terrific touchpad tricks
You’ve moused around. You’ve clicked. Maybe you’ve even clicked and dragged. But wait! There’s more.
To perform a right-click—say, to bring up a context menu—you can either click two fingers on the touchpad at the same time or hold down the Alt key and click with one finger.
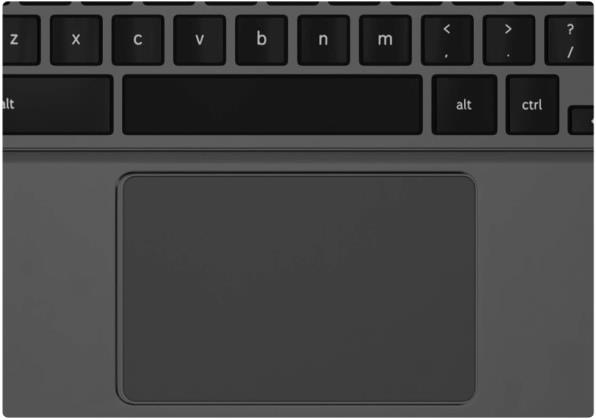
You can also use two fingers at a time to scroll up and down or left and right. If you’ve got an active webpage open in Chrome, swiping left or right acts like clicking the back or forward buttons in the browser.
To open a link in a new Chrome tab, click it with three fingers at once. To switch between open tabs, swipe left or right with three fingers.
Pin your favorite apps to the shelf
By default, you’ve got a few apps ever-present at the bottom of your Chromebook screen. To add new ones, click the little circle in the lower-left corner, then click the arrow above the search bar to see all your apps.
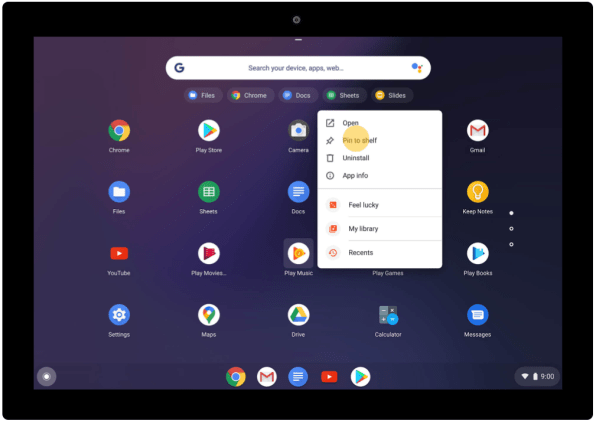
Find the app you want to pin to the shelf, right-click it—either by clicking with two fingers or by holding the Alt key before you click—and select the “Pin to shelf” option.
The app will now sit alongside the other pinned apps on the shelf for quick access.
Set up multiple virtual desktops
Let’s say you have one Chromebook for all your work stuff, and you’re thinking of buying a second Chromebook for all your personal stuff.
Don’t do it!
Click the Show Windows key, which is located five keys to the right of the Esc key, and then click “+ New desk” in the upper-right corner.
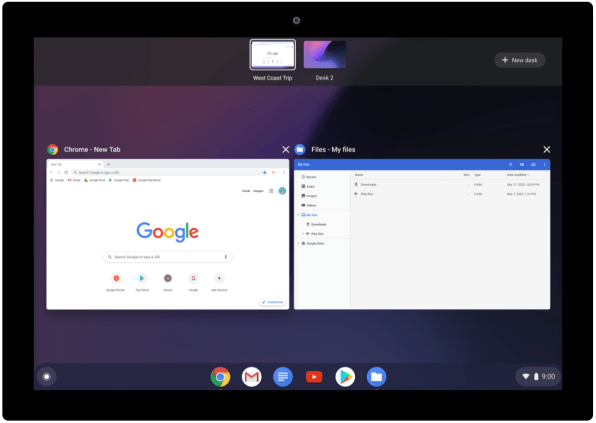
You’ll see two desktops in the bar at the top. You can name the second one if you like. Then you can either click into it to start setting up your windows and apps or drag a currently open window into the new desktop.
To switch between desktops, you can either hit the Show Windows key again or hold down the Alt key and press the Tab key to flip between them. It’s like having two Chromebooks in one.
Use Google Assistant for quick voice searches
If you use Google Assistant on your smartphone, you can enjoy similar functionality on your Chromebook.
Click the clock in the lower-right corner, followed by the little gear icon in the menu that pops up. That’ll get you into the Settings menu.
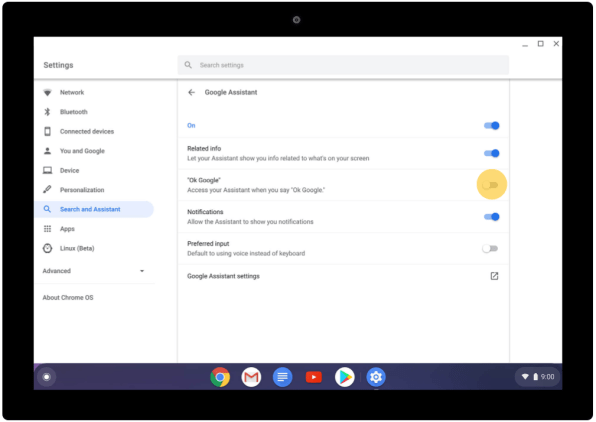
Once you’re in the Settings menu, choose Search and Assistant in the left-hand column. Select the Google Assistant option, enable it, and then toggle the “OK Google” option on.
When you want to access Google Assistant, just say “OK Google” or hold down the Search key (it’s underneath the Tab key) and press A.
Add wireless printing
As long as your printer isn’t ancient, you can probably connect it to your Wi-Fi network so you can send print jobs to it from the other side of the house.
To get your printer connected and saved to your Chromebook, click the clock in the lower-right corner, then the Settings gear, and then under the Advanced section, click Printing.
Select the “Printers” option at the top and then tap the icon next to “Add Printer” on the next page.
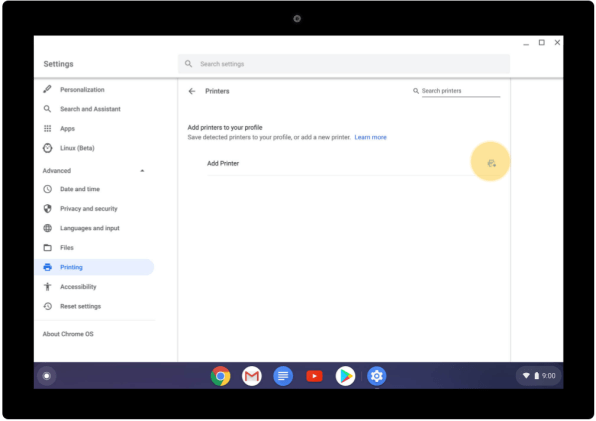
If your Chromebook and your printer are connected to the same network, you should see your printer pop up in the “Add a nearby printer” modal.
Select it and click the Add button. Your printer should now be located in the list of options under the Destination drop-down the next time you go to print something.
And should you find your network isn’t cooperating or you can’t get your printer online, you can always try plugging it into your Chromebook the old-fashioned way: via a USB cable.
Record pictures and videos of your screen
Back in the day, screen-grabbing used to require complicated and/or expensive software, but it’s now easier than ever, free, and built right into the operating system.
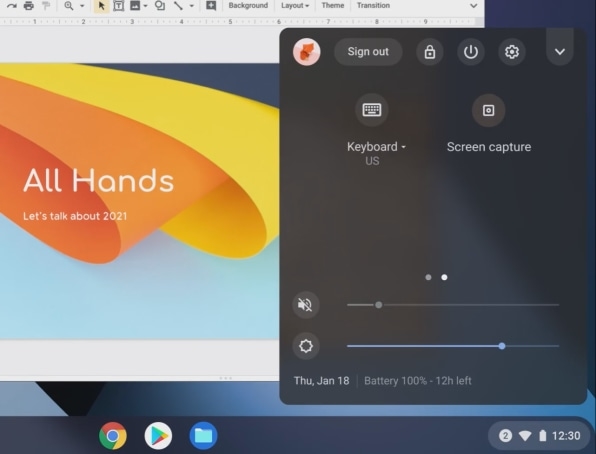
You’ll need to be running at least the March 2021 version of the Chrome operating system—check here for how to update—but once you’re locked and loaded, just click the clock icon in the lower-right corner, swipe right from the Quick Settings panel, and choose the “Screen capture” option.
From there, you’ll be able to choose whether you want to capture an image or a video, and whether you want to grab the entire screen or just a portion of it.
Use your phone’s internet connection
On the go without a reliable Wi-Fi network? Share your phone’s data signal with your Chromebook instead.
Android users running the March 2021 update of the Chrome operating system can enjoy an array of features such as responding to text messages, monitoring the phone’s battery life, and opening recent browsing tabs from the phone on the Chromebook instead.
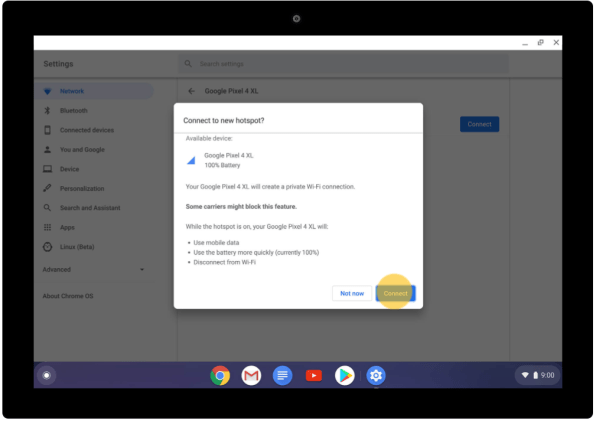
To enable these features, head into Settings (clock > gear icon: you know the drill). On the main Settings page, there’s a heading called “Connected devices” now. Click the button to set up your Android phone, enter your credentials, and you’ll be up and running.
The next time you want to share your Android phone’s mobile data, just click the clock in the lower-right corner and click the network icon. You should see your phone as an option under the “Mobile data” heading along with nearby Wi-Fi networks.
If you have an iPhone or you don’t want to directly control your Android phone, you can simply head into your phone’s data-sharing settings, establish a Wi-Fi network on the phone, and select it from the Network section on your Chromebook after clicking on the clock in the lower-right corner.
Instructions for establishing a mobile hotspot using an iPhone can be found here; instructions for Android can be found here.
To Chromebook or not to Chromebook?
If you read these tips and you’re now thinking, “Hey! I, too, want to feel the elation of Chromebook ownership, but I don’t yet own a Chromebook,” you can follow these helpful steps by a handsome Fast Company contributor to turn an old laptop into a Chromebook.
And if you’ve had enough of all this Chromebook business, you can follow these equally helpful steps by the same handsome man detailing how to get your Chromebook ready to sell.
(51)

