Want to speed up Windows? Tweak these 3 settings
In its first 37 years, Windows has come a long way. But thanks to its nearly unlimited selection of apps, beautiful visuals, and other resource-hungry capabilities, system slowdowns can still present a very real challenge.
There’s hope, though. With a couple of minutes and a handful of clicks, you can speed things up exponentially and keep them running smoothly into the future. These tricks work for both Windows 10 and Windows 11, so give them a try if your PC feels a bit sluggish.
Prevent apps from starting automatically
Many programs that come pre-installed on your PC or that you install yourself think they’re so very important that they have the unmitigated gall to start automatically each time your computer starts.
The thing is: Most of them don’t need to be running all the time. And each program that’s running takes away system resources from other programs.
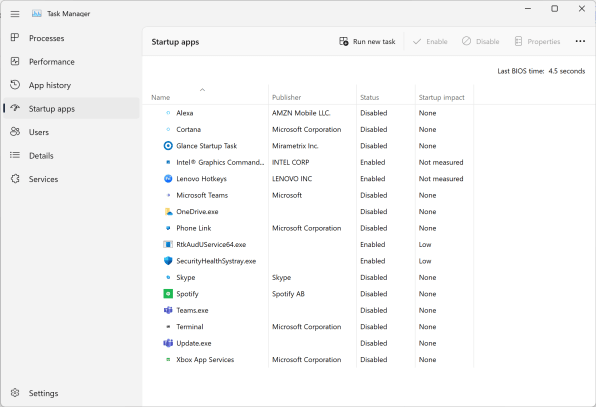
So, let’s prevent these self-important apps from starting up on their own by hitting CTRL+Shift+Esc to open up the Task Manager. Then navigate to the “Startup apps” section, which on Windows 11 looks like a speedometer icon in the left-hand navigation bar.

You’ll see the various offenders here. Spotify? Come on, Spotify. You don’t need to be running unless I open you. Ditto for Teams. You too, Alexa.
Click each app you want to prevent from auto-starting and change its entry to Disable in the menu up at the top. Do this for as many apps as you can, then restart your machine. The next time it boots up, it should feel nice and nimble.
Turn on storage sense
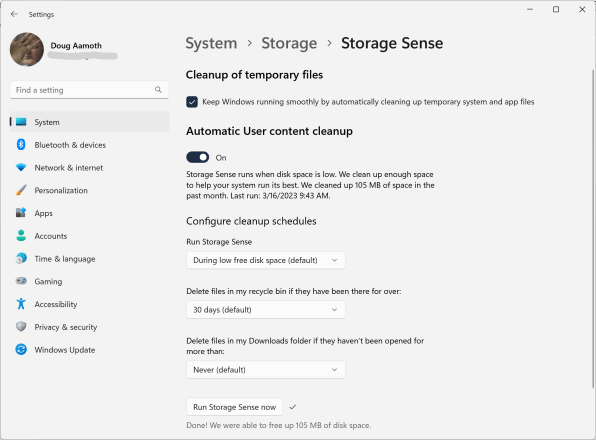
If your machine seems abnormally sluggish, it might just be overloaded with temporary files, deleted items, and other digital detritus you don’t need. Instead of trying to manage this all yourself, turn on the Storage Sense feature. It kicks in when your computer is running low on disk space, deleting unneeded files to free up space.

To enable Storage Sense, click Start, then Settings, then System, then Storage—or search for Storage Sense using the Windows search feature. You can simply toggle the feature on and then let it do its thing once space gets low, or kick things off manually by clicking the “Run Storage Sense now” button at the bottom of the modal.
Tone down the visuals
Okay, so you’ve prevented startup apps from running and you’ve toggled Storage Space on, but things still aren’t quite humming along smoothly enough.
We’ve got a couple more things to try: one that ideally helps enough to get you back on track and a more nuclear option.
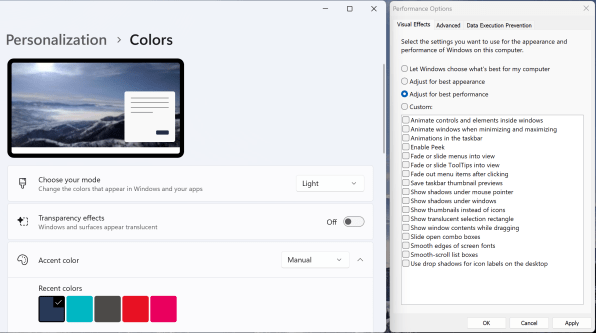
The first thing to try is axing transparency effects. These make windows, menu bars, and other elements appear translucent—a cool effect, but potentially slowdown-inducing.

Right-click on your desktop and choose Personalize, then Colors. The second item down—“Transparency effects”—can be toggled off. See if that helps and if it does, great.
If not, we’ve got the nuclear option. Type “performance” into the Windows search bar and choose “Adjust the appearance and performance of Windows” from the results. In the menu that pops up, select the “Adjust for best performance” option and click OK.
Now, you’ll notice that Windows looks . . . weird. But it should be much more performant. You can head back into this menu and selectively re-enable certain features to make Windows look better, so play around to find a balance between speed and beauty.
(40)


